¶ Linksys WRT AC Series
¶ Introduction
The Linksys WRT AC series routers are dual-core, dual-partition, 802.11ac, with OEM firmware based on OpenWrt. The overall look of these devices is a throwback to the venerable WRT54G.
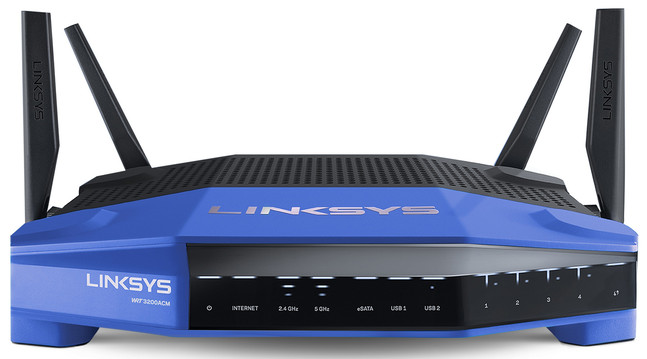
¶ Hardware
This series uses Marvell Armada based chips from the Marvell Embedded Business Unit (mvebu) in devices listed below:
WRT1200AC v1/v2, WRT1900AC v1, WRT1900AC v2, WRT1900ACS v1/v2, WRT3200ACM, WRT32X
¶ Dual Firmware Flashing
The WRT AC series of routers uses a dual firmware flash layout. This means that two separate firmware partitions are included on the device and are flashed in an alternating fashion.
If booting from the primary partition, the secondary (or alternate) partition will be flashed on next sysupgrade, and booting is toggled to happen from that partition. The same logic applies to secondary-->primary. Note that this means there is no permanent "OEM partition" and "OpenWrt partition". Both firmwares follow the same round-robin logic, where partition usage changes at each sysupgrade. The current firmware always remains as the fallback, and the new firmware is flashed to the other partition.
See the Flash Layout section on each device page for more details, or options to switch between partitions below.
It is recommended to install the LuCI package luci-app-advanced-reboot for managing the dual firmware. Here you see the status and reboot into the desired partition.
¶ Flashing Firmware
Download the latest OpenWrt firmware for your device from Firmware Selector.
¶ OEM install
-
Login to Linksys WebUI (Default IP: 192.168.1.1; Password: admin)
-
Connectivity <wrap em>-></wrap> Manual Update
- Select factory image [.img]
-
Once flash completes, router will reboot
- If the image selected
-
Has LuCI pre-installed:
-
- Does not have LuCI pre-installed:
-
- Linux/BSD: SSH client built in
- Windows: SSH client built in
-
¶ Sysupgrade
<color #508CAA>LuCI</color>
-
Login to the OpenWrt WebUI (Default IP: 192.168.1.1)
- System <wrap em>-></wrap> Backup/Flash Firmware <wrap em>-></wrap> Flash New Firmware Image <wrap em>-></wrap> Choose File
-
Select Sysupgrade bin file [.bin]
- Untick Keep Settings, then select Flash Image
<color #508CAA>CLI</color>
- Login to OpenWrt via SSH
- Linux/BSD: SSH client built in
- Windows: SSH client built in
- Download/Upload firmware image to router
-
Download via SSH terminal:
<WRAP lo>cd /tmp && opkg update && opkg install wget && wget <Image-Link>{.is-info} <color #646464>--// OR //--</color>
- Upload via Client Machine Terminal: <WRAP lo>
scp -r -i "C:\OpenWrt.ppk" -2 -scp -P 22 "D:\Path\To\Firmware.img" root@192.168.1.1:/tmp-
For PuTTY, change: '' scp '' to '' pscp -scp ''
* ''-scp '' <wrap indent em>=</wrap> <color #646464>force use of SCP protocol</color>
-
''-r '' <wrap indent><wrap indent em>=</wrap></wrap> <color #646464>copy directories recursively</color>
-
''-i '' <wrap indent><wrap indent em>=</wrap></wrap> <color #646464>private key file for user authentication</color>
-
''-2 '' <wrap indent><wrap indent em>=</wrap></wrap> <color #646464>force use of particular SSH protocol version [2]</color>
-
''-p '' <wrap indent><wrap indent em>=</wrap></wrap> <color #646464>connect to specified port</color>
- Flash image
-
SSH terminal:
<WRAP lo>cd /tmp && sysupgrade -n -v <image-name>- ''-n '' <wrap indent><wrap indent em>=</wrap></wrap> <color #646464>do not save configuration over reflash</color>
- ''-v '' <wrap indent><wrap indent em>=</wrap></wrap> <color #646464>more verbose</color>
-
¶ Return to OEM
<color #508CAA>LuCI</color>
- Due to missing/incompatible metadata in OEM images, sysupgrade must be forced via the command line
<color #508CAA>CLI</color>
- Login to OpenWrt via SSH
- Linux/BSD: SSH client built in
- Windows: SSH client built in
- Download/Upload firmware image to router
-
Download via SSH terminal:
<WRAP lo>cd /tmp && opkg update && opkg install wget && wget <Image-Link>{.is-info} <color #646464>--// OR //--</color>
- Upload via Client Machine Terminal: <WRAP lo>
scp -r -i "C:\OpenWrt.ppk" -2 -scp -P 22 "D:\Path\To\Firmware.img" root@192.168.1.1:/tmp-
For PuTTY, change: '' scp '' to '' pscp -scp ''
* ''-scp '' <wrap indent em>=</wrap> <color #646464>force use of SCP protocol</color>
-
''-r '' <wrap indent><wrap indent em>=</wrap></wrap> <color #646464>copy directories recursively</color>
-
''-i '' <wrap indent><wrap indent em>=</wrap></wrap> <color #646464>private key file for user authentication</color>
-
''-2 '' <wrap indent><wrap indent em>=</wrap></wrap> <color #646464>force use of particular SSH protocol version [2]</color>
-
''-p '' <wrap indent><wrap indent em>=</wrap></wrap> <color #646464>connect to specified port</color>
- Flash image
-
SSH terminal:
<WRAP lo>cd /tmp && sysupgrade -F -n -v <image-name>- ''-F '' <wrap indent><wrap indent em>=</wrap></wrap> <color #646464>force write, required to bypass metadata check</color>
- ''-n '' <wrap indent><wrap indent em>=</wrap></wrap> <color #646464>do not save configuration over reflash</color>
- ''-v '' <wrap indent><wrap indent em>=</wrap></wrap> <color #646464>more verbose</color>
-
¶ Firmware Recovery
If the firmware has an issue, chances are you can recover it easily due to the Dual Firmware partition layout, by switching to the alternate firmware. For this reason, it is recommended to always keep a known working firmware on the other partition (either OEM or OpenWrt).
Switch router from primary to alternate partition or vice versa using any of the methods below:
¶ LuCI
- Install
luci-app-advanced-reboot:
- SSH: <WRAP lo>
opkg update && opkg install luci-app-advanced-reboot
2.  **WebUI:**
    1.  **System \<wrap em\>-\>\</wrap\> Software**
        1.  **Actions \<wrap em\>-\>\</wrap\> Update Lists**
        2.  **Actions \<wrap em\>-\>\</wrap\> Filter**
            1.  `luci-app-advanced-reboot` **\<wrap em\>-\>\</wrap\> Find Package**
        3.  **Status: Available packages**
            1.  **Install** `luci-app-advanced-reboot`

                - **System \<wrap em\>-\>\</wrap\> Advanced Reboot**
¶ Serial
-
Connect via Serial: <WRAP lo>
reboot -
At 3 second autoboot interrupt delay, press any key
-
Boot
-
Primary Partition
-
Armada XP <WRAP lo>
run linksysnandboot -
Armada 385 <WRAP lo>
run nandboot
-
-
Alternate Partition:
-
Armada XP <WRAP lo>
run linksysaltnandboot -
Armada 385 <WRAP lo>
run altnandboot
-
-
¶ SSH
-
Determine current partition: <WRAP lo>
/usr/sbin/fw_printenv -n boot_part -
Boot
-
Primary Partition: <WRAP lo>
/usr/sbin/fw_setenv boot_part 1 && reboot -
Alternate Partition: <WRAP lo>
/usr/sbin/fw_setenv boot_part 2 && reboot
-
¶ Power Switch
-
Power off router with power switch.
- Turn power back on and power LED will light.
-
As soon as all LEDs turn off (~2s), power off router with power switch
- Turn power back on and power LED will light.
-
As soon as all LEDs turn off (~2s), power off router with power switch
- Turn power back on and power LED will light.
-
As soon as all LEDs turn off (~2s), power off router with power switch
- Turn power back on and allow router to fully boot.
- It should now be booted to the alternate firmware partition
Explanation: There is a counter for boot attempts. The counter is increased by 1 at the start of each boot process, then is reset to 0 after a successful boot. If the counter reaches 3, the boot is considered a failure and the boot partition is switched to the other partition (A-->B or B-->A).
Thus if you interrupt the boot process three times, the router thinks that the current firmware is faulty and switches to the other partition. Note that there is no guarantee that the other partition works. It has the contents and settings that were there when the boot was switched last time, usually at the last sysupgrade. That boot marker switch (A-->B or B-->A) happens at every sysupgrade, so likely you just have the previously used firmware there (either OEM or OpenWrt). But the marker may have been manually toggled, or auto-toggled after three failures.
¶ Serial Port
¶ Synopsis
<wrap indent>Serial Port is labeled J1 on the board, utilizing a JST PH 6 pin connector with a 2.0mm pitch, operating at 3.3v</wrap>
- <color #960000>The more common 2.54mm pitch <wrap em><color #960000>will not</color></wrap> fit properly.</color>
- In a pinch, removing the plastic casing from 2.54mm female connectors allows for a stable enough connection.
- <color #c80000>Ensure leads are insulated with electrical tape</color>
<!-- -->
- If flashing regularly, you may wish to invest in a USB-TTL AJ cable
- USB-TTL AJ cables require installation of a 3.5mm Jack (F) on the router
¶ Serial Header
<color #508CAA>Pin Out</color> <color #508CAA>Pins</color> <color #508CAA>1</color> <color #508CAA>2</color> <color #7d7d7d>3</color> <color #508CAA>4</color> <color #7d7d7d>5</color> <color #7d7d7d>6</color> <color #508CAA>Function</color> Gnd Tx <color #7d7d7d>n/a</color> Rx <color #7d7d7d>n/a</color> <color #7d7d7d>n/a</color>
¶ Bootloader
¶ Corrupt Environment Recovery
If the U-Boot bootloader environment becomes corrupted, it can be reset or restored
¶ Reset
Issue the following at the
Marvell >>prompt:env default -a saveenv reset¶ Restore
++++ WRT3200ACM | <wrap right button>Instructions Repo</wrap> <color #508CAA>mtd0 bin</color>
**contributed by:** *ValCher1961** **Boot Version v0.0.4** * [[https://github.com/ValCher1961/McDebian_WRT3200ACM/blob/master/recovery-uboot/uboot-v004-wrt3200.bin|NAND AMD / Spansion (S34ML02G2)]]\\ \\ * **Boot Version v1.0.0** * [[https://github.com/ValCher1961/McDebian_WRT3200ACM/blob/master/recovery-uboot/uboot-v100-wrt3200.bin|NAND Winbond / MXIC (W29N02GV)]]
++++
++++ WRT32X | <wrap right button>Instructions Repo</wrap> <color #508CAA>mtd0 bin</color>
**contributed by:** *ValCher1961** **Boot Version v2.0.9** * [[https://github.com/ValCher1961/McDebian_WRT3200ACM/blob/master/recovery-uboot/uboot-v209-wrt32.bin|NAND Winbond and MXIC (W29N02GV)]]
++++
¶ Corrupt Bootloader Recovery
¶ Prerequisites
Hardware
- PC running Linux
- x86 libraries if x64
- USB – TTL Cable
UART Boot Files
  * ''[[http://www.protechs-online.com/downloads/McDebian/u-boot-recovery/WRT1200AC_uboot_v2.0.13.bin|WRT1200AC]]''
  * ''[[http://www.protechs-online.com/downloads/McDebian/u-boot-recovery/WRT1900AC_uboot_v1.3.25.bin|WRT1900ACv1]]''
  * ''[[http://www.protechs-online.com/downloads/McDebian/u-boot-recovery/WRT1900AC_V2_WRT1900ACS_V1_V2/WRT1900ACv2_WRT1900ACS_uboot_v1.0.13.bin|WRT1900ACv2 & WRT1900ACS]]''
  * ''[[http://www.protechs-online.com/downloads/McDebian/u-boot-recovery/WRT3200ACM_uboot_1.0.0.bin|WRT3200ACM]]''
  * ''[[http://www.protechs-online.com/downloads/McDebian/u-boot-recovery/WRT32X_uboot_2.0.9.bin|WRT32X]]''

  * ''[[http://www.protechs-online.com/downloads/McDebian/u-boot-recovery/x64/kwboot|kwboot.tar]]'' & ''[[http://www.protechs-online.com/downloads/McDebian/u-boot-recovery/x64/kwboot-patched|kwboot-patched.tar]]''
¶ Instructions
-
Terminal root access:
sudo -i -
Download kwboot & kwboot-patched:
- Set kwboot as executable:
Chmod 755 kwboot -
Connect USB-TTL to router and PC <wrap em>(don’t power on router)</wrap> & issue:
dmesg | grep USB- Make note of the number after
/dev/ttyUSB(usually 0), then:chmod 666 /dev/ttyUSB0
- Make note of the number after
-
Boot router using UART image and power on router:
./kwboot -t /dev/ttyUSB0 -b WRT1200AC_uboot_v2.0.13.bin -pOR
./kwboot-patched -f -t -p -b WRT1200AC_uboot_v2.0.13.bin -B 115200 /dev/ttyUSB0- Turn router on at the same time you press [
ENTER] for the kwboot command-
You may need to power cycle the router a few times before the script poll succeeds, as the timing is crucial
- After the transfer finishes, you should be at the
Marvell >>prompt:
- After the transfer finishes, you should be at the
-
- <wrap em>If you are not:</wrap>
- Power Off Router <wrap em>-></wrap> Disconnect USB-TTL Cable from PC <wrap em>-></wrap> Go Back to Step 4
- <color #009600>If you are:</color>
-
Set up TFTP server on PC //(such as Ubuntu’s
tftpdpackage)// -
Put
WRT1200AC_uboot_v2.0.13.binin it’stftpboot/directory- Connect PC to router (ethernet), set PC IP to
192.168.1.254/24, and issue at theMarvell >>prompt:
setenv serverip 192.168.1.254 setenv netmask 255.255.255.0 ping 192.168.1.254 tftp 2000000 WRT1200AC_uboot_v2.0.13.bin nand erase 0 200000 nand write 2000000 0 200000 - Connect PC to router (ethernet), set PC IP to
-
- Turn router on at the same time you press [
-
If the above commands complete successfully, reboot router via:
reset-
Router should boot and stop at the
Marvell >>prompt- Download firmware image for your device and save it to
tftpboot/:
- Download firmware image for your device and save it to
- Issue the following at the
Marvell >>prompt:tftp 192.168.1.254 get <firmware_image_name>
-
-
<wrap danger lo>IMPORTANT:</wrap>
- After transfer completes successfully, <wrap em>DO NOT issue</wrap>:
- '' run flash_pri_image '' || '' run flash_alt_image '' || '' run update_both_images ''
-
<wrap em>These will brick the router again sending you back to Step 3</wrap>
- <color #009600>Instead:</color> <WRAP group>
-
- '' run flash_pri_image '' || '' run flash_alt_image '' || '' run update_both_images ''
- After transfer completes successfully, <wrap em>DO NOT issue</wrap>:
run_linksysnandboot
<WRAP third column 10% center><color #960000>IF FAILS:</color> <WRAP third column 40% center>
run_linksysaltnandboot
- Allow router to fully boot:
- Verify it’s up and running correctly via the WebUI
- Power Off Router <wrap em>-></wrap> Disconnect USB-TTL Cable <wrap em>-></wrap> Power Back On
¶ Configuration
These settings can be configured in LuCI and are recommended for general reliability:
- Wi-Fi settings under Network -> Wireless:
- radio0: 5GHz, set country code, mwlwifi driver, channel to 36 or auto, WPA2, 80MHz width, remaining settings default.
- radio1: 2.4GHz, set country code, mwlwifi driver, WPA2, 20MHz width, remaining settings default.
- radio2: disabled. Note this can be configured for IoT device or client mode connections.
- Software flow offloading: Network -> Firewall -> General Settings tab -> Software flow offloading from dropdown.
- Packet Steering per this discussion: Network -> Interfaces -> Global Network Options -> Packet steering (all CPUs) from dropdown.
- Install
luci-app-advanced-rebootto manage the dual partitions of these devices with LuCI as discussed in the Dual Firmware section. - Install and enable
luci-app-irqbalancewhich can move mwlwifi from CPU0 to CPU1, however this may also increase wifi latency. Irqbalance is often more viable on >=4core CPUs per this irqbalance#caution.
Note that the CPUs in these devices, while performant for their era, do not include hardware offloading (via HFO or WED) for routing/NAT packets and thus why SFO is recommended.
¶ Marvell WiFi
Depending on the model described in Supported Hardware it has either the 88W8864 or 88W8964 wifi chip. Both use mwlwifi, a mac80211 driver that is open source with a closed source firmware. Although the driver is stable for use of 802.11ac (2.4GHz and 5GHz), some features were not implemented: MU-MIMO, 802.11s mesh, and 802.11w are not supported by the driver. Workarounds for common issues are described below. See also mwlwifi github.
To query driver version:
apk list --installed mwlwifi
¶ WPA3 support
WPA3 is supported for WRT1200 and WRT1900 devices on version 23.05.3 onward via the mwlwifi driver.
WPA3 remains unsupported for WRT3200ACM and WRT32X devices as per the driver commit notes. Use WPA2 and blame Marvell for the incomplete Wi-Fi driver.
¶ Latency with 88W8864
Models with wlan 88W8864 (WRT1200/WRT1900) had higher wifi latency where disabling amsdu in /etc/rc.local was shown to reduce wifi latency, albeit with a drop to peak throughput. This was resolved with the mwlwifi 10.4.10 driver update included with 23.05.3 onward, where the fix below should no longer be used.
# turn off A-MSDU frame aggregation
echo "0" >> /sys/kernel/debug/ieee80211/phy0/mwlwifi/tx_amsdu
echo "0" >> /sys/kernel/debug/ieee80211/phy1/mwlwifi/tx_amsdu
¶ ESP chip devices won't connect
There is an issue 2709 with the mwlwifi driver connecting to some IoT devices. See bug report here: ESP8266/Embedded devices unable to connect to 2.4Ghz Radio
Workarounds:
- Enable radio2 on the mwifiex driver (kmod-mwifiex-sdio). Connect ESP chip devices here may improve connectivity, however could result in other conflicts.
- Optional: disable LDPC on radio1 (2.4GHz) may improve connectivity as per https://github.com/kaloz/mwlwifi/issues/278#issuecomment-697433463.
- Optional: disable WMM on the interface (however this will also disable 802.11n/ac capability, tremendously slowing throughput).
¶ DFS channels not working
When setting certain DFS channels for the AP the interface comes up briefly and then is disabled. DFS channels are listed in the output of iw list on the 5GHz radio in the frequencies section and will have the text (radar detection) at the end of the line.
¶ Information and potential work-arounds
- If possible use a non-DFS channel.
- Removing the package
kmod-mwifiex-sdiomay workaround the issue. This is the older wifi driver and has been replaced by mwlwifi. - There is an issue with DFS on UK channels described here.
- Original mwlwifi bug described it here but is now closed.
- There were also changes to not lock the regulatory domain to avoid undesired effects like messed up system reg domain when another adapter is present or broadcasting incorrect country code in many countries. An alternate implementation can be found here and another here.
¶ 88W8964 VAP SSID broadcasts but clients can't connect
The driver rejects any packets from interfaces which are not within a mask (FD:FF:FF:FF:FF:F0) of the main interface (primary AP or STA). You should set the locally administered bit for the MAC address, and then freely set any final digit. Keep in mind that the MAC address should be unicast (not multicast) or hostapd will not start the interface. This then leaves you only with even digits for the second digit of the address (i.e. 2, 4, 6, 8, a, c, e).
To make VAPs work, it is recommended to manually set the macaddr for each wifi-iface section of your /etc/config/wireless e.g. if your primary MAC is 60:38:e0:ce:37:50, your wifi config for 3 APs (1 primary + 2 VAPs)
config 'wifi-iface'
    option 'device'     'radio0'
    option 'network'    'lan'
    option 'mode'       'ap'
    option 'ssid'       'MainAP'
    option 'encryption' 'psk2'
    option 'key'        'secret passphrase'
    option 'macaddr'    '60:38:e0:ce:37:50'

config 'wifi-iface'
    option 'device'     'radio0'
    option 'network'    'lan'
    option 'mode'       'ap'
    option 'ssid'       'GuestAP1'
    option 'encryption' 'psk2'
    option 'key'        'secret passphrase'
    option 'macaddr'    '62:38:e0:ce:37:51'

config 'wifi-iface'
    option 'device'     'radio0'
    option 'network'    'lan'
    option 'mode'       'ap'
    option 'ssid'       'GuestAP2'
    option 'encryption' 'psk2'
    option 'key'        'secret passphrase'
    option 'macaddr'    '62:38:e0:ce:37:52'
¶ OEM Firmware Images
| <color #007DFA>Linksys OEM Firmware</color> | |||||
|---|---|---|---|---|---|
| Device | Version | Repository | Changelog | Date | |
| WRT1200AC | v1 | 1.0.5.187766 | Repo | txt | 2018.05.01 |
| ::: | v2 | 2.0.6.191786 | ::: | txt | 2018.12.10 |
| WRT1900AC | v1 | 1.1.10.187766 | Repo | txt | 2018.04.12 |
| ::: | v2 | 2.0.8.187766 | ::: | txt | 2018.04.26 |
| WRT1900ACS | v1 | 1.0.3.187766 | Repo | txt | 2018.04.20 |
| ::: | v2 | 2.0.3.201002 | ::: | txt | 2020.05.01 |
| WRT3200ACM | v1 | 1.0.8.199531 | Repo | txt | 2020.02.13 |
| WRT32X | v1 | 1.0.180404.58 | Repo | txt | 2018.04.23 |
Linksys GPL source code for the devices listed above: https://www.linksys.com/us/support-article?articleNum=114663
¶ Community Builds
¶ Divested
Divested builds include security focused patches and settings and are updated often. Web: divested.dev. Forum: OpenWrt Forum - divested builds.
¶ PureFusion
Discontinued in 2022. PureFusion builds included a lot of common packages. Github: Releases page. Forum: OpenWrt Forum - PureFusion.
¶ Davidc502
Discontinued in 2020. Davidc builds were used by a large proportion of the mvebu community. Forum: OpenWrt Forum - davidc502 builds.
¶ Hardware Mods
¶ USB-TTL Audio Jack Install
<WRAP> ++++ Pin Out |
<color #508CAA>Pin Out</color> <color #508CAA>Serial Port</color> <color #508CAA>1</color> <color #7d7d7d>(Gnd)</color> <color #508CAA>2</color> <color #7d7d7d>(Tx)</color> <color #508CAA>4</color> <color #7d7d7d>(Rx)</color> <color #508CAA>Male Jack</color> Base Tip Ring
++++
++++ Cable |
<color #508CAA>Cable</color> Tip & Ring wires will vary depending on manufacturer; pictured above is an FTDI cable ++++
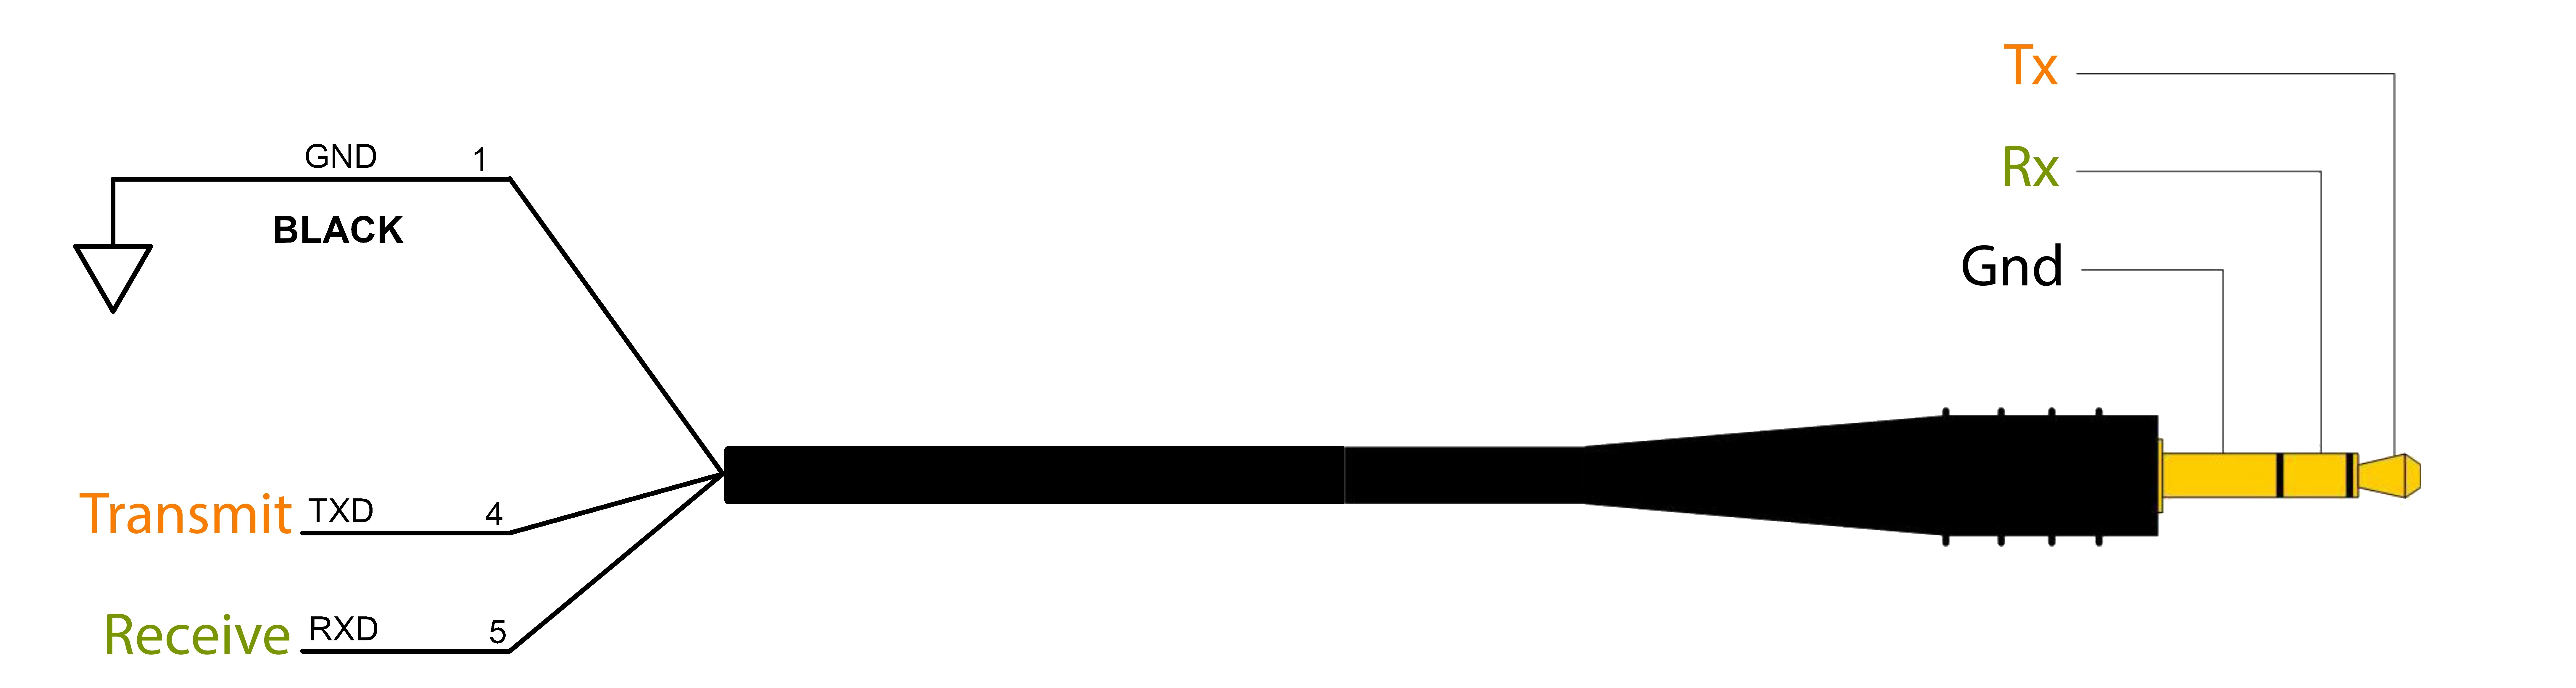
++++ 3.5mm Jack Install |
<color #508CAA>3.5mm Jack (F) Installation</color> 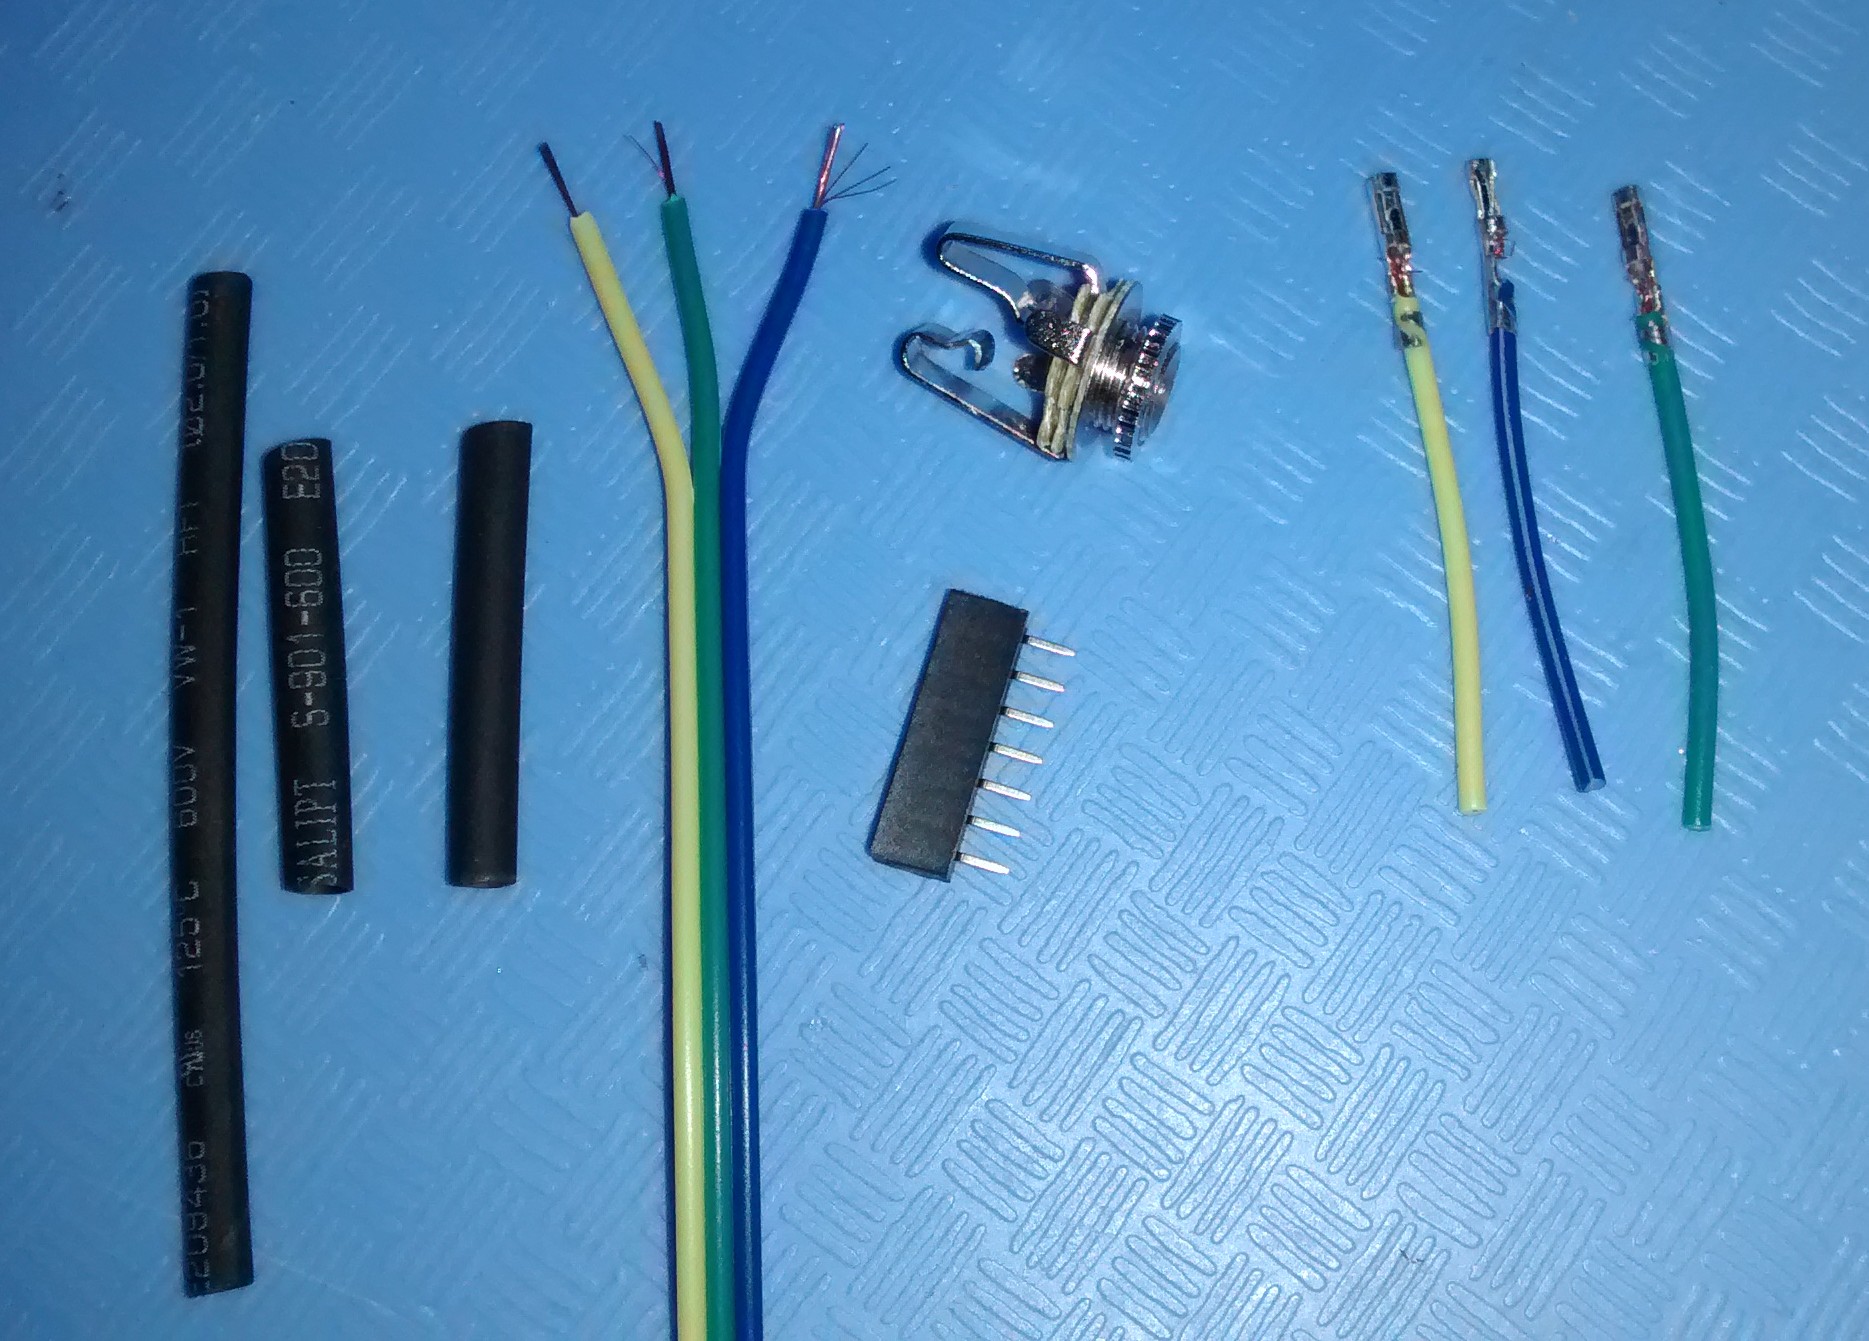
<color #646464>Utilized a 2mm pitch female socket header in lieu of a JST connector</color>
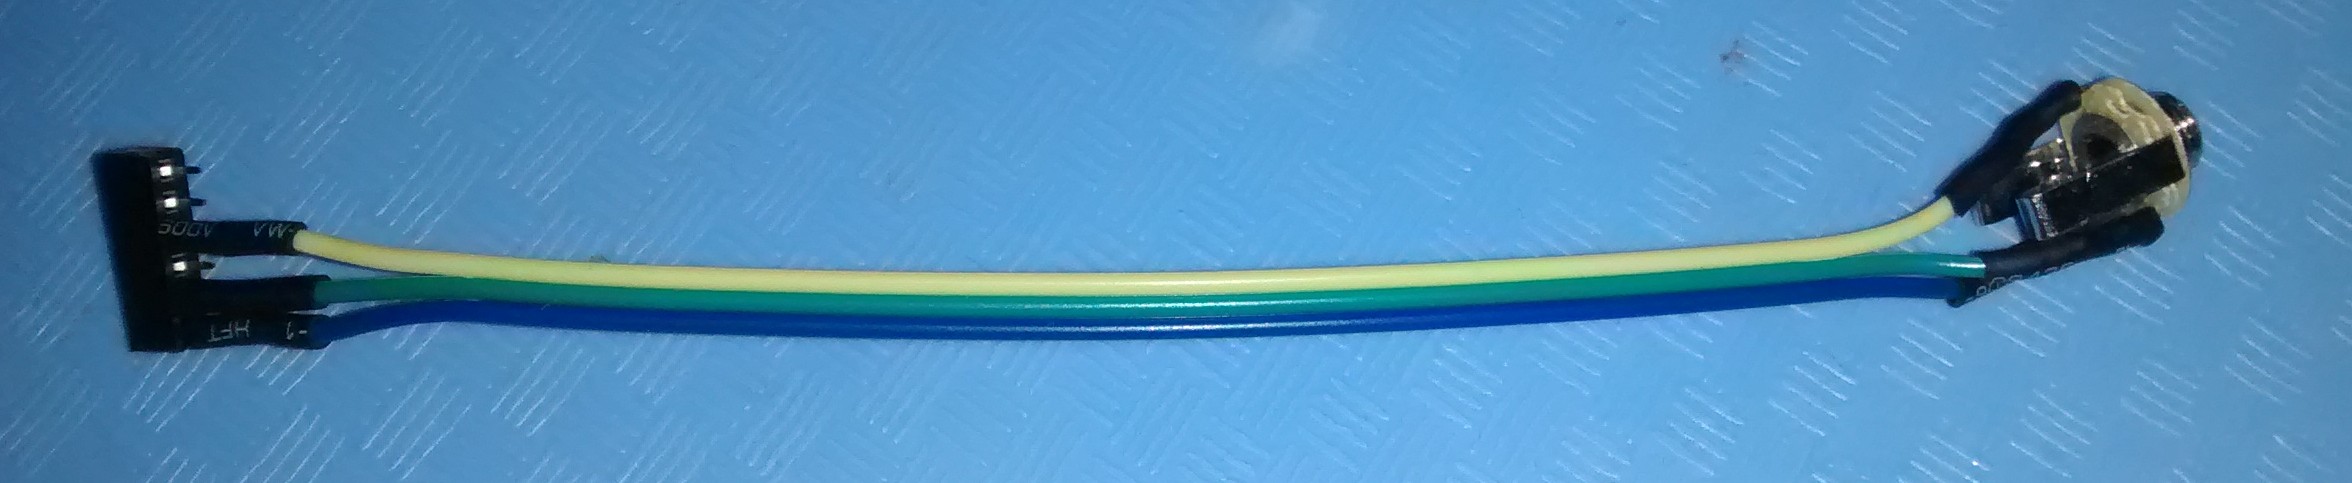
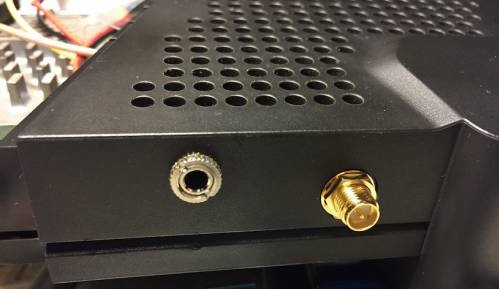
- There are a number of different PCB 3.5mm female jack variations
- All come in 6 types, 1 pin - 6 pin (must have at least 3 pins)
<!-- -->
- Placement location is personal preference
- For example, vertical ridges on case interior can be trimmed off with a diagonal cutter to make room
<!-- -->
- A 6.35mm [.25"] mounting hole should be sufficient; <wrap em>above all, measure twice, cut once</wrap>
<wrap safety>Recommendations</wrap>
- <wrap em>3.5mm terminals should be insulated</wrap>
- Adhesive lined heat-shrink tubing would be ideal for covering the 3.5mm terminals (3.175mm [1/8"] in diameter)
- Adhesive lined provides strong stability to the joint due to thicker walls & rigidity from the adhesive
- Adhesive lined heat-shrink tubing would be ideal for covering the 3.5mm terminals (3.175mm [1/8"] in diameter)
<!-- -->
- Recommended way to shrink tubing is with a heat gun, set to ~260C (500F), with it's blower on low
- Heat gun should be kept in constant motion, ~20cm (~8") away from the tubing, never leaving it stationary
- If tubing begins to change color (darkening, glossiness, etc.) or bubble/expand, temperature is too high
- Heat gun should be kept in constant motion, ~20cm (~8") away from the tubing, never leaving it stationary
++++
¶ Separating esata mod Install
<WRAP> ++++ Solder Pic | It is possible to solder a dedicated usb port to the EUHP (eSATA USB Hybrid Port) so that the EUHP become a dedicated esata port.
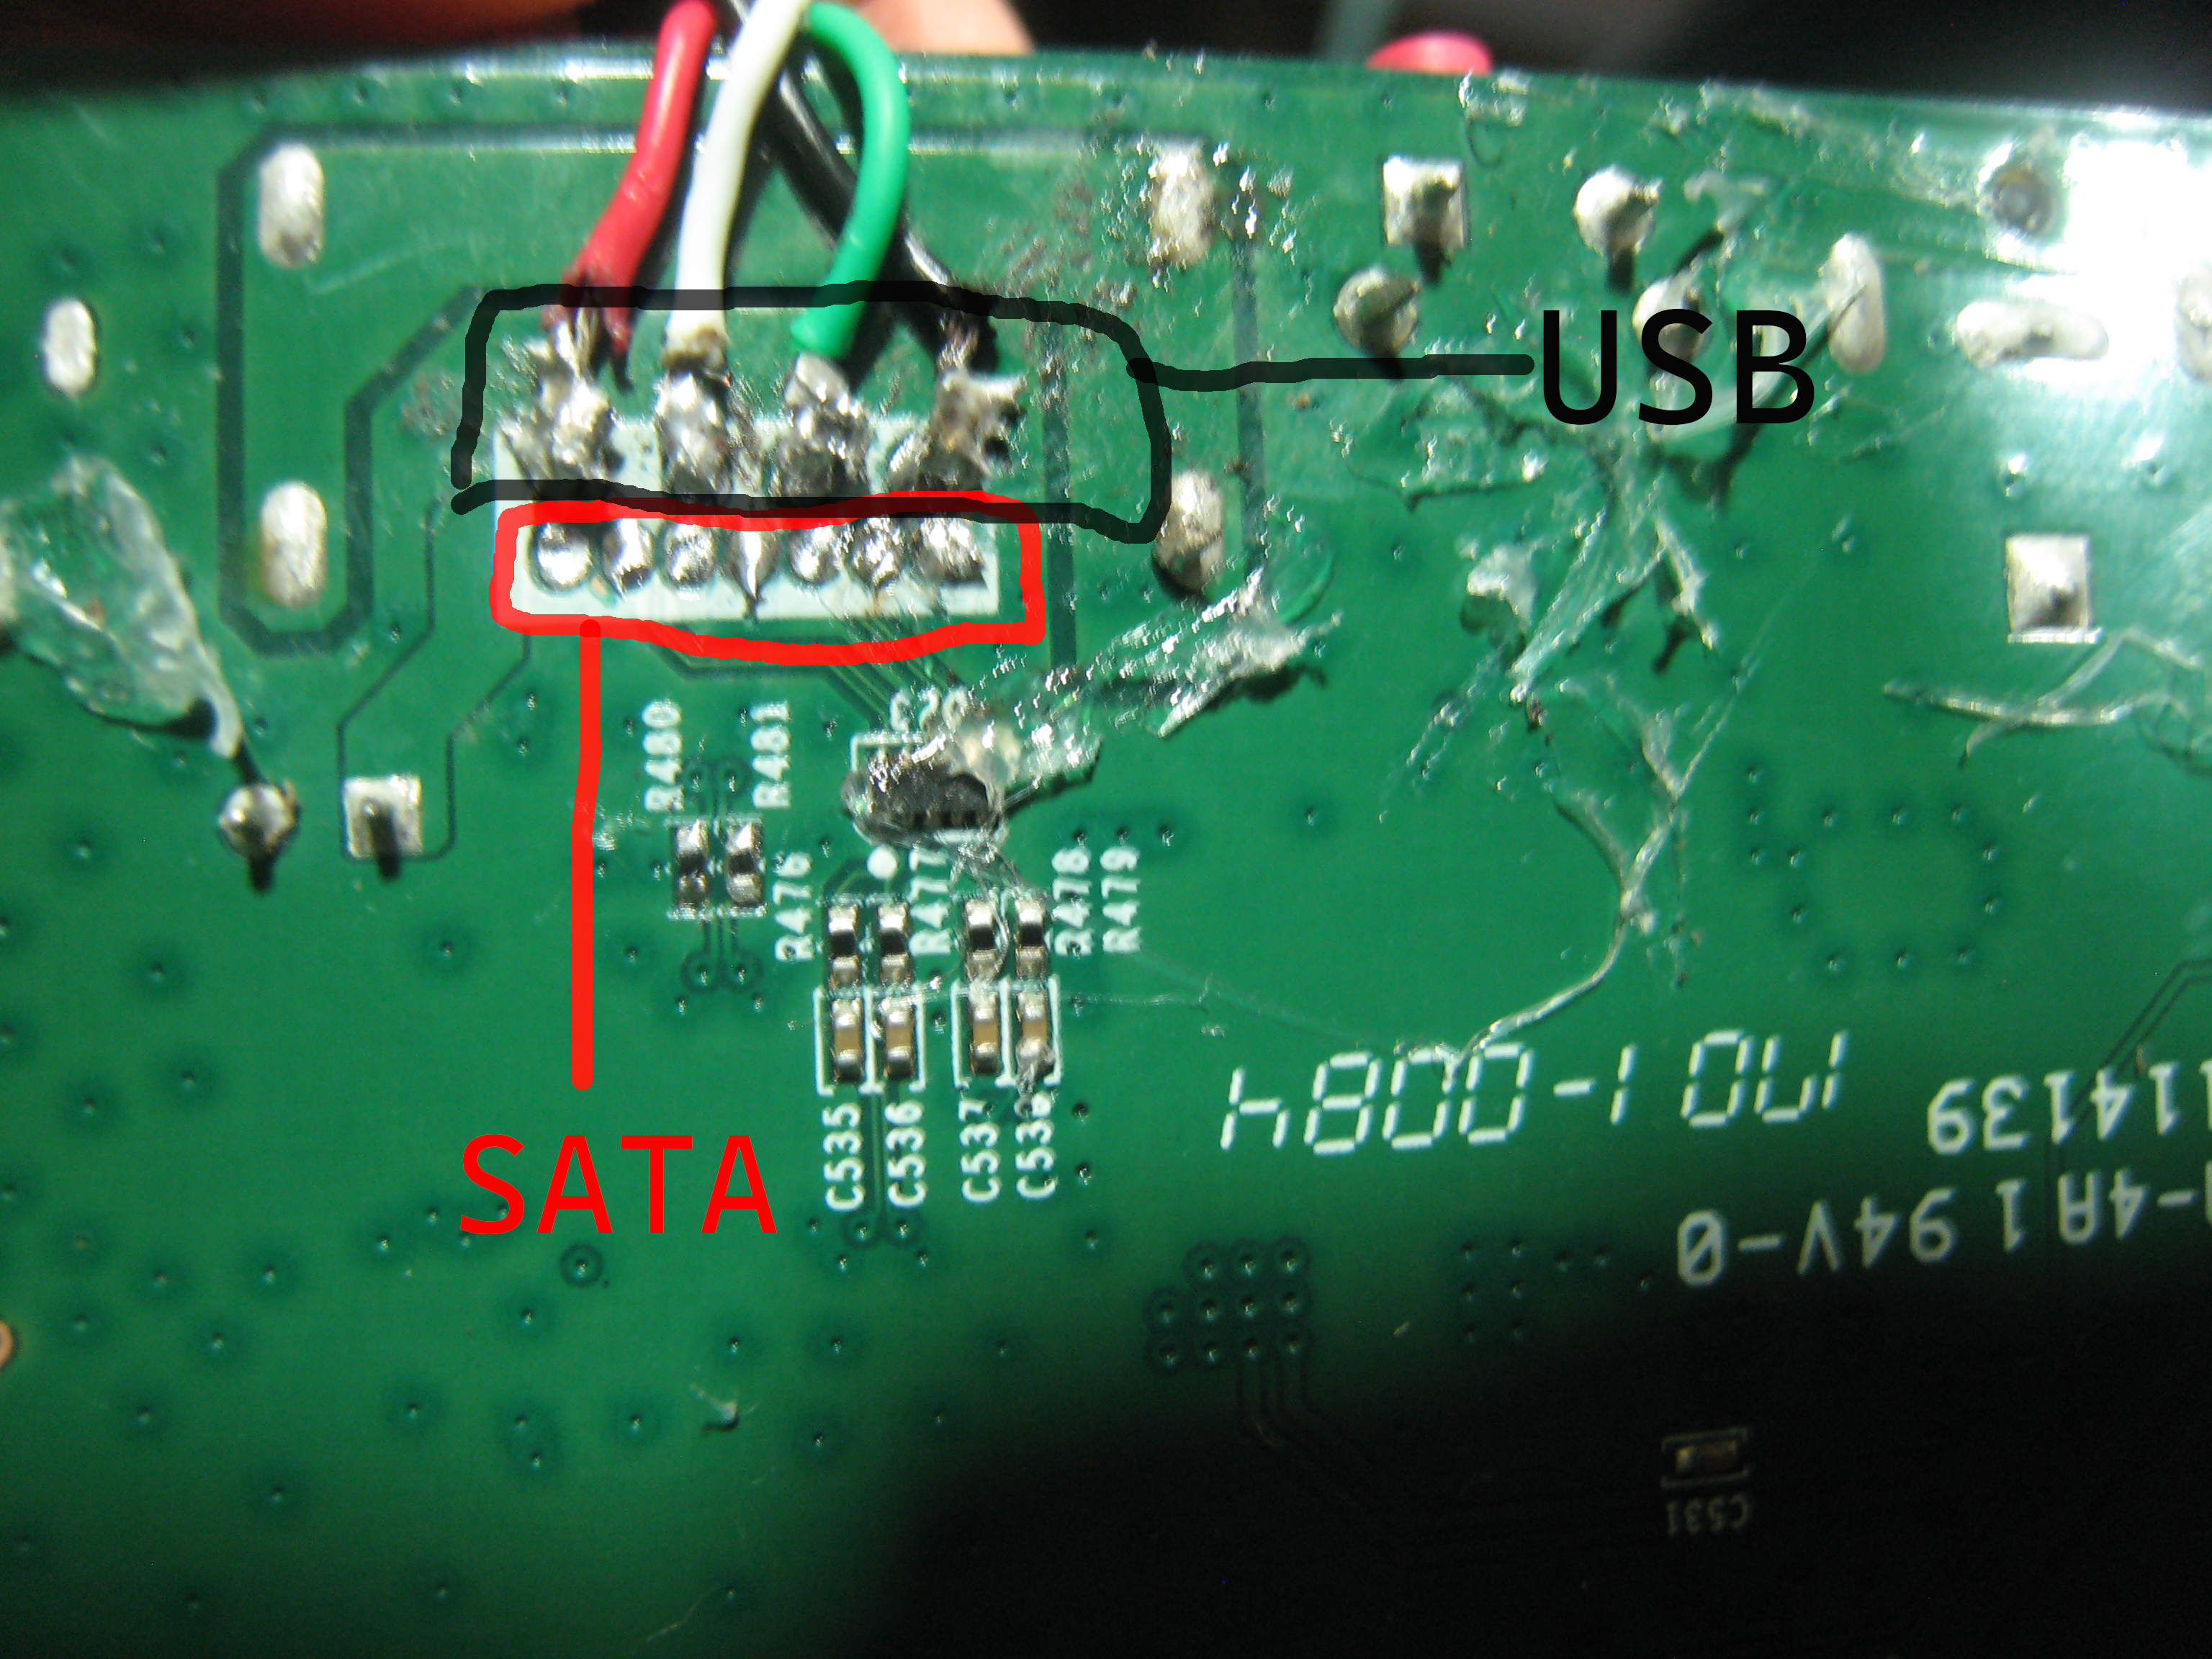
(Pinout : Red is 5V , White is D- , Green is D+ , GND is -5v ++++
¶ Troubleshooting
¶ Serial Port
++++ Armada 385 |
<color #508CAA>WRT1200AC / WRT1900AC v2 / WRT1900ACS / WRT3200ACM / WRT32X</color> <WRAP centeralign>On the Armada 385, Serial Port is labeled J10*, with the triangle indicating* Pin 6
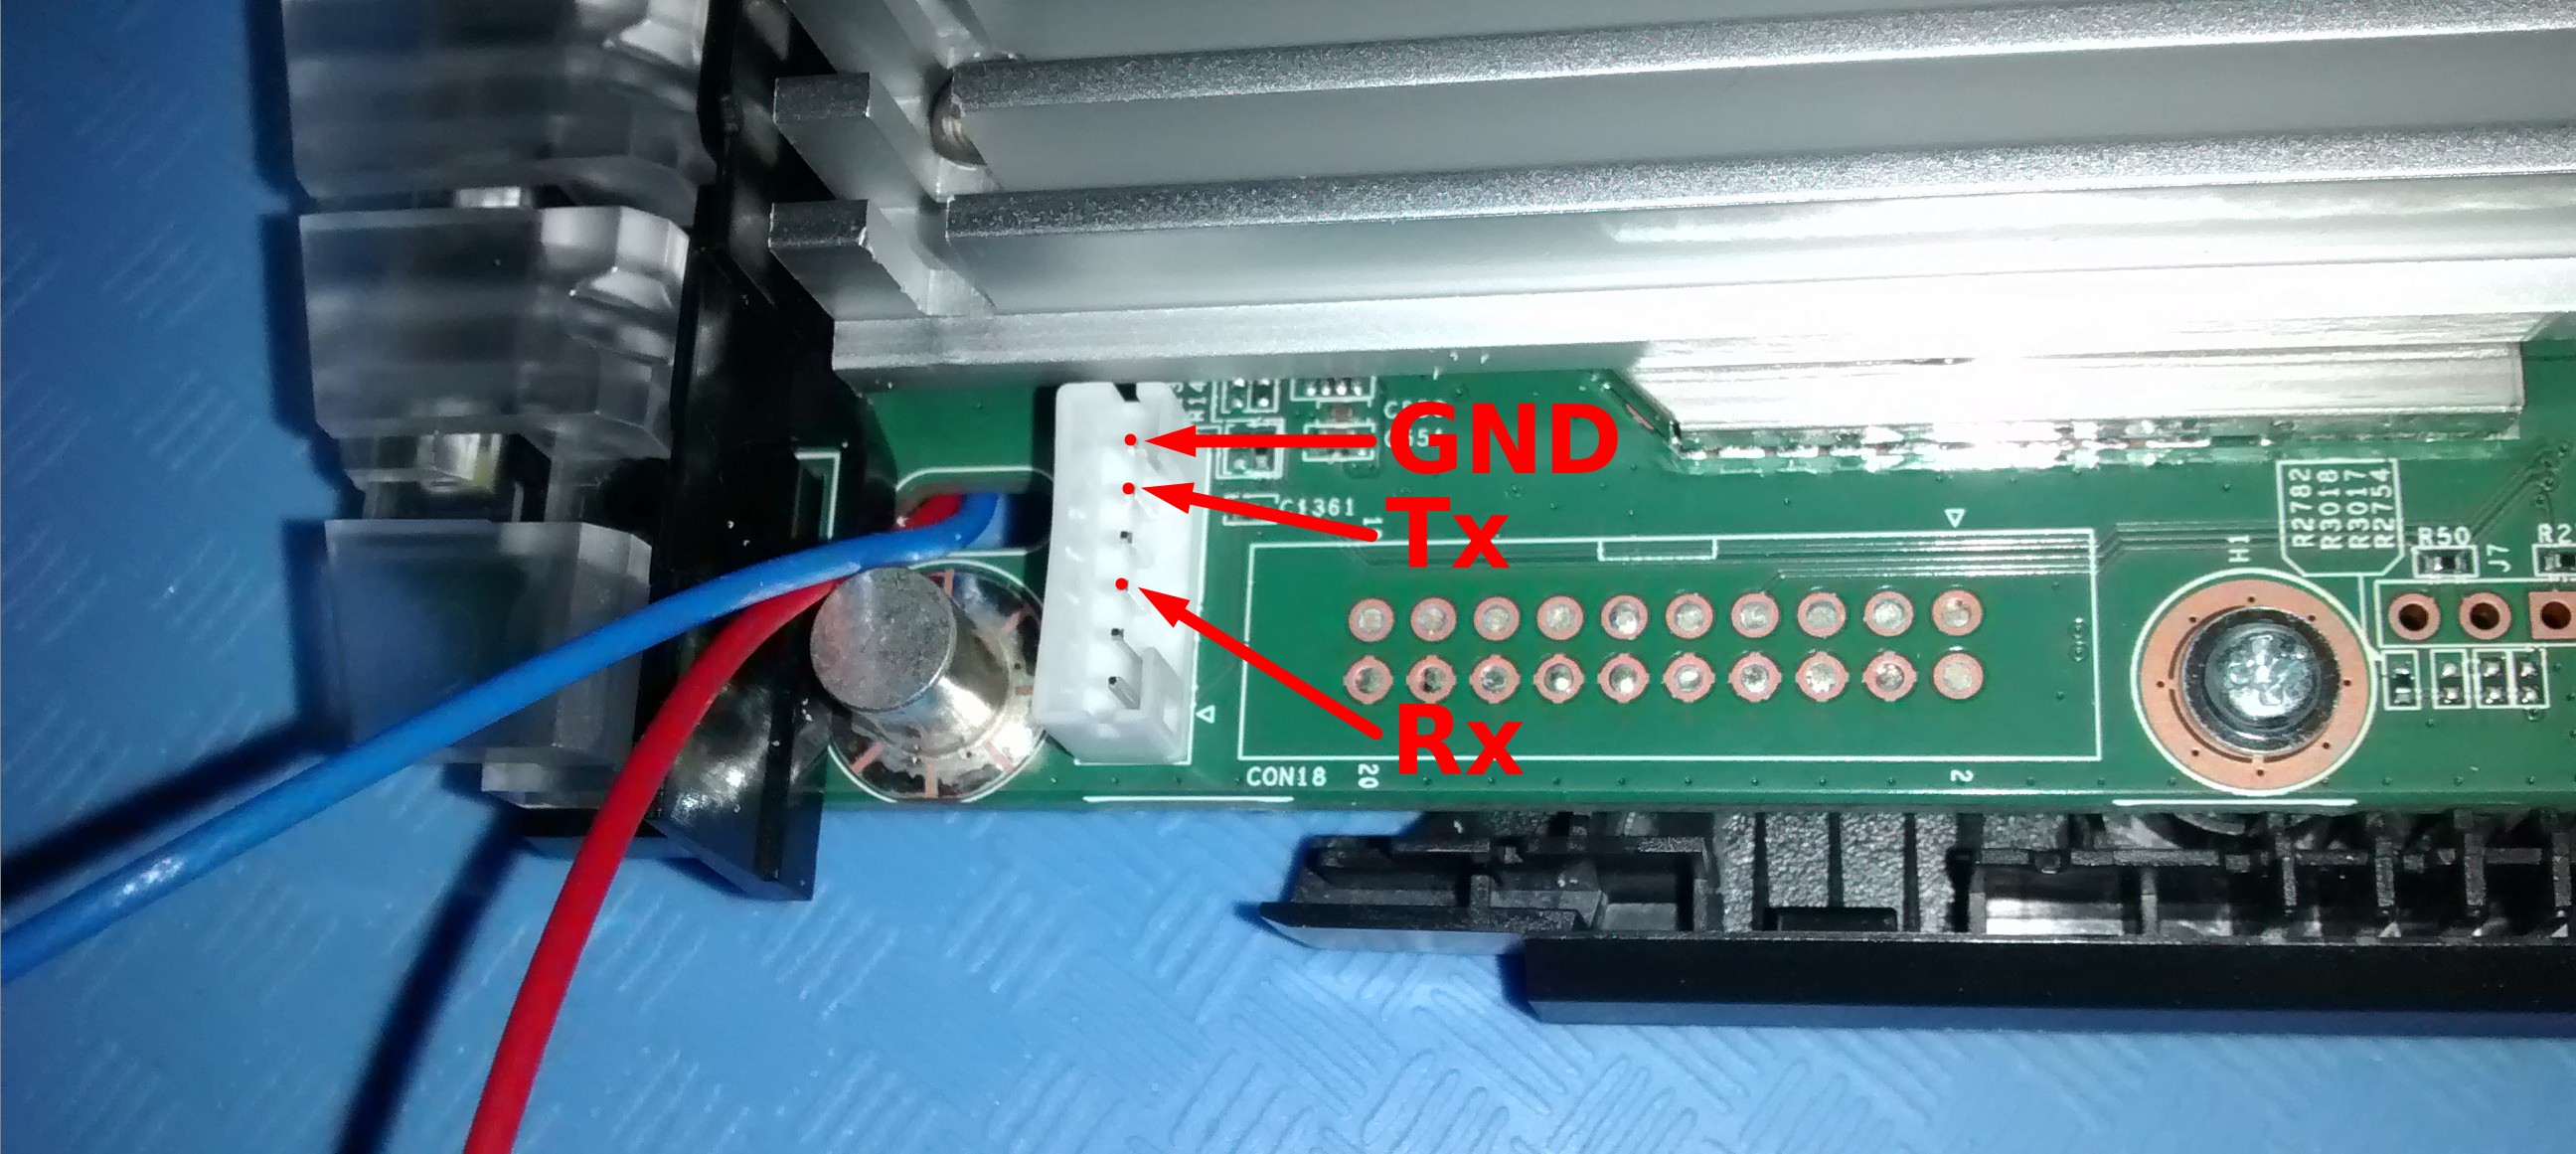
Housing Disassembly:
- Remove front foot screws
- Pull front blue cover straight forward slowly, but firmly
++++
¶ Serial Interfaces
¶ Arduino
<WRAP> ++++ Pin Out |
<color #508CAA>Pin Out</color> <color #508CAA>Serial Port</color> <color #508CAA>1</color> <color #7d7d7d>(Gnd)</color> <color #508CAA>2</color> <color #7d7d7d>(Rx)</color> <color #508CAA>4</color> <color #7d7d7d>(Tx)</color> <color #508CAA>Pins</color> Gnd 0 1
++++
++++ Header |
<color #508CAA>Header</color>
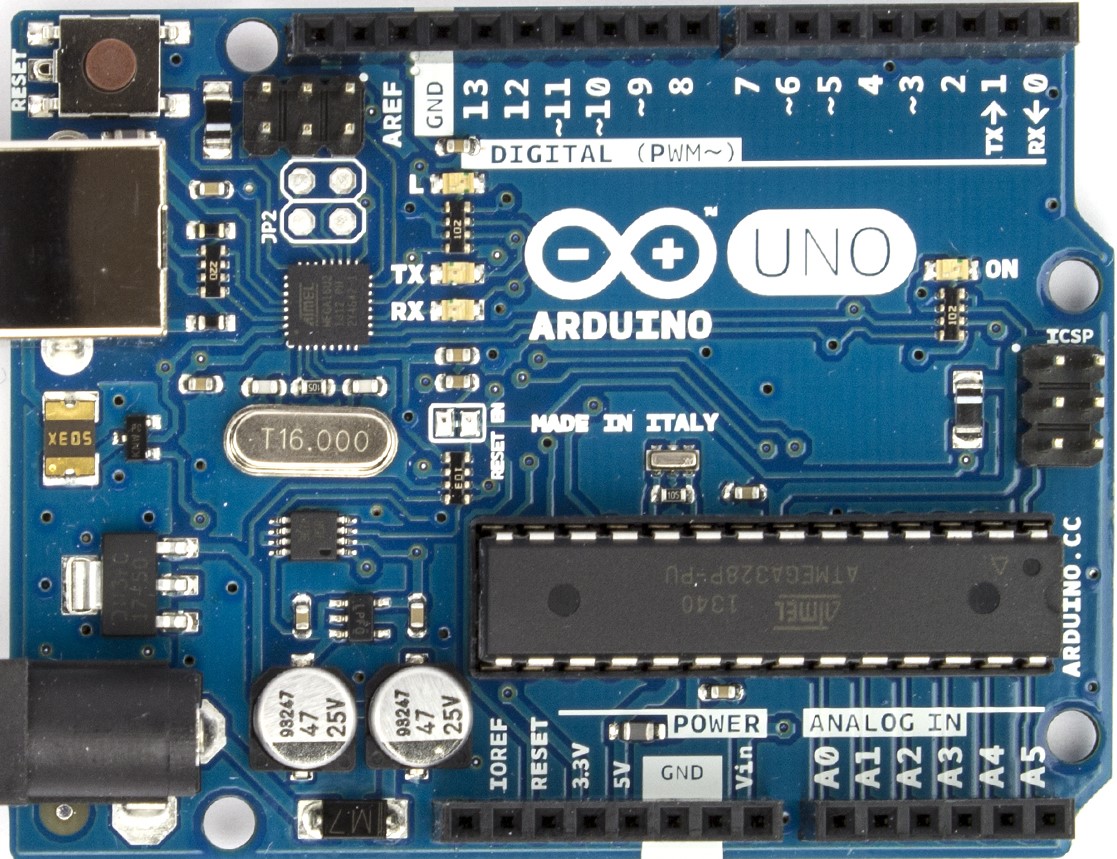
++++
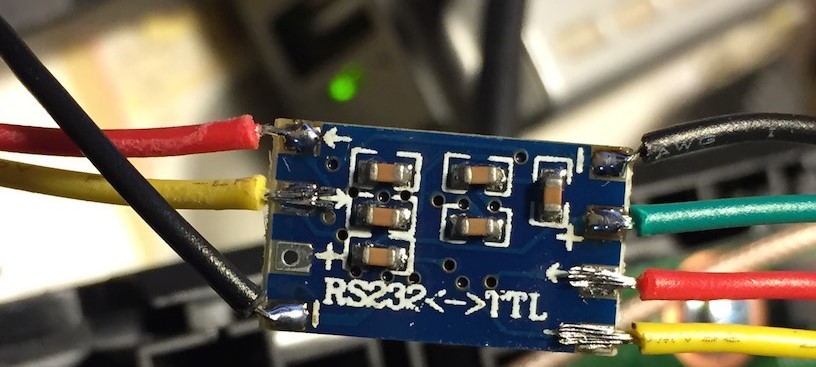
¶ MAX232
<WRAP> ++++ Pin Out |
<color #508CAA>Pin Out</color> <color #508CAA>Serial Port</color> <color #508CAA>1</color> <color #7d7d7d>(Gnd)</color> <color #508CAA>2</color> <color #7d7d7d>(Rx)</color> <color #508CAA>4</color> <color #7d7d7d>(Tx)</color> <color #508CAA>Pins</color> Gnd 1 0
++++
++++ Line Driver |
<color #508CAA>Line Driver</color> Converts TTL level RS-232 signals to standard 12v utilized by most RS-232 interfaces ++++
¶ USB-to-UART
<WRAP> ++++ Pin Out |
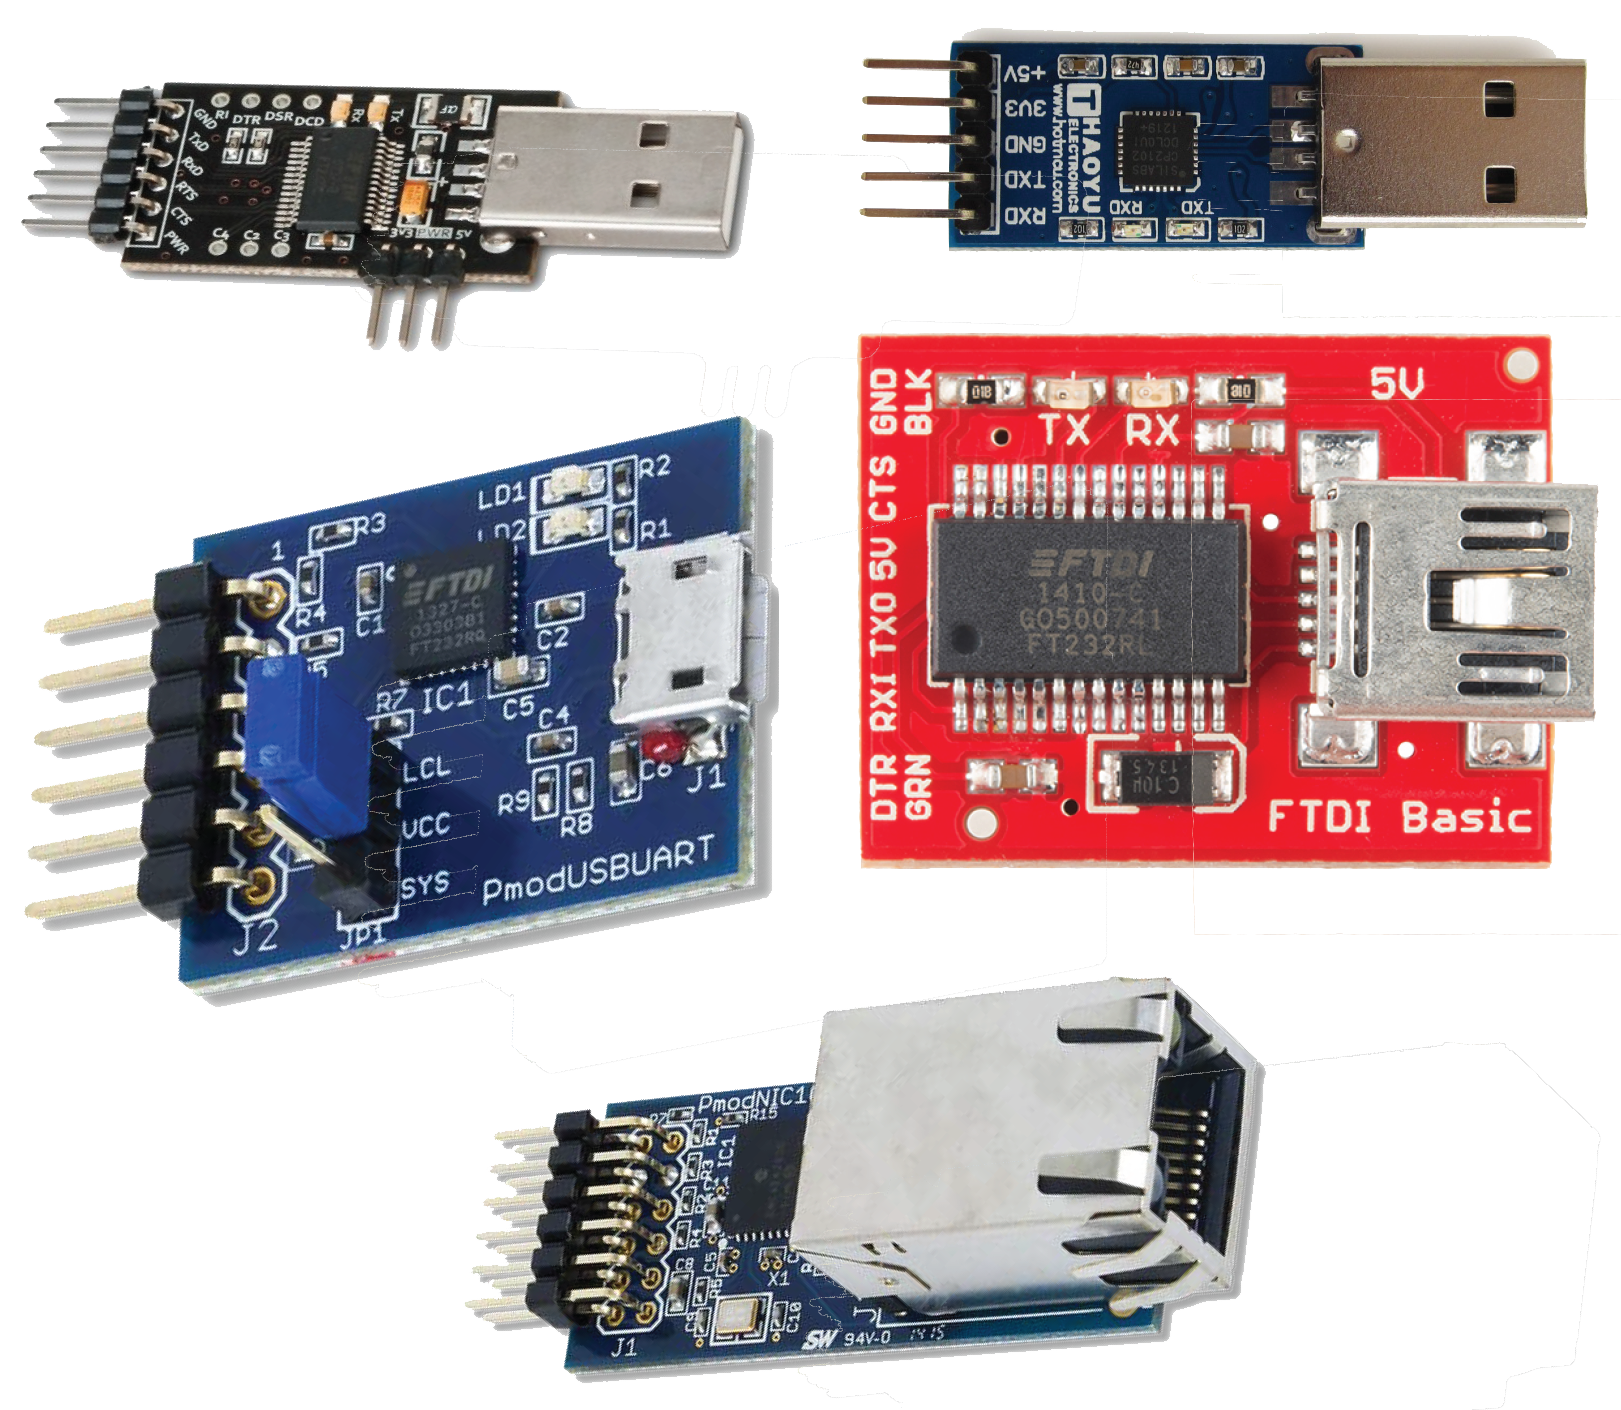
<color #508CAA>Pin Out</color> <color #508CAA>Serial Port</color> <color #508CAA>1</color> <color #7d7d7d>(Gnd)</color> <color #508CAA>2</color> <color #7d7d7d>(Rx)</color> <color #508CAA>4</color> <color #7d7d7d>(Tx)</color> <color #508CAA>Pins</color> Depends Upon Manufacturer
++++
++++ Adapter |
<color #508CAA>USB-to-UART Examples</color> If eSATA LED lights immediately after reboot with no serial output, add a 4.7KΩ resistor between Gnd & Rx on adapter
<wrap indent><wrap indent><wrap centeralign indent>4.7KΩ 4 Band: yel | pur | red | gold (±5%)</wrap></wrap></wrap> <wrap indent><wrap indent><wrap centeralign indent>4.7KΩ 5 Band: // yel | pur | blk | brn | brn (±1%)//</wrap></wrap></wrap> ++++
¶ Serial Flash
¶ Prerequisites
- <WRAP> ++++ USB-TTL Cable |
<color #508CAA>USB-TTL cable</color>
- See Serial Header for connectivity
++++
- <WRAP> ++++ Serial Interface |
<wrap right button>Windows Serial Profile PuTTY</wrap> <color #508CAA>Serial Interface</color>
PC running TFTP Server
- Windows profile is set to
COM3, please update accordingly-
Line 206:
"SerialLine"="COM3" -
Via PuTTY: PuTTY <wrap em>-></wrap> Serial Line
* Once downloaded, right-click on registry key, select merge, then OK
-
When PuTTY is opened/re-opened after the merge, profile Serial will be available to select
-
<!-- -->
- Serial Values:
- BAUD Rate:
115200 - Data Bits:
8 - Stop Bits:
1
- BAUD Rate:
++++
- <WRAP> ++++ TFTP Server |
<wrap right button>Windows Config TFTPd64</wrap> <color #508CAA>TFTP Server</color>
PC connected to router via ethernet
  * **''tftpd32.ini''** must be placed in the TFTP root folder with the executable
    * **Line 36:** **''BaseDirectory=D:\TFTP\FLASH''**
    * **Via TFTPd:** //TFTPd <wrap em>-></wrap> Current Directory//
      * Must reflect image file location and //cannot contain spaces//
++++
- <WRAP> ++++ OEM Firmware Names |
| <color #508CAA>Armada XP</color> | ||
|---|---|---|
| <color #646464>Device</color> | <color #646464>Version</color> | <color #646464>OEM Default Firmware Image Name</color> |
| <color #508CAA>WRT1900AC</color> | v1 | blk-mamba.128mb.img |
| <color #508CAA>Armada 385</color> | ||
|---|---|---|
| <color #646464>Device</color> | <color #646464>Version</color> | <color #646464>OEM Default Firmware Image Name</color> |
| <color #508CAA>WRT1200AC</color> | v1 / v2 | caiman.img |
| <color #508CAA>WRT1900AC</color> | v2 | cobra.img |
| <color #508CAA>WRT1900ACS</color> | v1 / v2 | cobra.img |
| <color #508CAA>WRT3200ACM</color> | v1 | rango.img |
| <color #508CAA>WRT32X</color> | v1 | venom.img |
++++
¶ Instructions
<WRAP> ++++ Flash via Serial: |
Connect USB-TTL cable to router serial header & PC (router *off*)
This assumes prerequisites (above) have been completed:
- USB-TTL drivers are installed
- Serial interface is set to correct COM port
- Correct serial values have been set
BAUD Rate
Data Bits
Stop Bits
Set LAN IP to subnet
192.168.1.254/24[*255.255.255.0*]Load
Serialprofile in PuTTY & open TFTP serverThere should be a blank terminal window
- Boot WRT AC Series router
There should be
U-bootoutput in terminal window
At 3 second autoboot interrupt delay, press any key
Issue following commands:
setenv serverip 192.168.1.254
setenv netmask 255.255.255.0
ping 192.168.1.254
run update_both_images
- Primary only:
run flash_pri_image- Alternate only:
run flash_alt_imageReboot via power switch or by issuing:
reset
++++
¶ Flash Output
++++ Successful | <color #508CAA>Successful Flash</color>
WRT1900AC v1... Hit any key to stop autoboot: 3 2 1 Marvell >> setenv serverip 192.168.1.254 Marvell >> setenv netmask 255.255.255.0 Marvell >> ping 192.168.1.254 host 192.168.1.254 is alive Marvell >> run flash_pri_image mvNetaSpeedDuplexSet Using egiga0 device TFTP from server 192.168.1.254; our IP address is 192.168.1.1 Filename 'blk-mamba.128mb.img'. Load address: 0x2000000 Loading: ################################################################# ################################################################# ################################################################# ### 5.6 MiB/s done Bytes transferred = 33292288 (1fc0000 hex) NAND erase: device 0 offset 0xa00000, size 0x4000000 Erasing at 0x49e0000 -- 100% complete. OK NAND write: device 0 offset 0xa00000, size 0x1fc0000 33292288 bytes written: OK
++++
++++ Unsuccessful | <color #508CAA>Unsuccessful Flash</color>
WRT1900AC v1... Hit any key to stop autoboot: 3 2 1 Marvell >> setenv serverip 192.168.1.254 Marvell >> setenv netmask 255.255.255.0 Marvell >> ping 192.168.1.254 ping failed; host 192.168.1.254 is not alive
- Turn off router
- Ensure you have set PC static IP to
192.168.1.254/24
- Reboot PC
- Verify static IP is still set
- Verify PC <wrap em><-></wrap> Router ethernet connection
- Go back to Step 4
OR
...
Hit any key to stop autoboot:  3  2  1

Marvell >> setenv serverip 192.168.1.254
Marvell >> setenv netmask 255.255.255.0
Marvell >> ping 192.168.1.254
host 192.168.1.254 is alive
Marvell >> run flash_pri_image
mvNetaSpeedDuplexSet
Using egiga0 device
TFTP from server 192.168.1.254; our IP address is 192.168.1.1
Filename 'blk-mamba.128mb.img'.
Load address: 0x2000000
Loading: T T T T T T T T T T T T T T T T T T T T T T T T T T T T T T T T
         T T T
done
Bytes transferred = 0 (00000000 hex)
NAND erase: device 0 offset 0xa00000, size 0x4000000
Erasing at 0x49e0000 -- 100% complete.
OK
NAND write: device 0 offset 0xa00000, size 0x1fc0000
0 bytes written: OK
- Verify TFTP server is running and firmware image is inside TFTP boot directory
- Verify PC <wrap em><-></wrap> Router ethernet connection
++++
¶ Tags
How to add tags 