¶ OpenWrt on VirtualBox HowTo
This document describes how to run the x86-64 OpenWrt images in <abbr>Virtual Machine (VM)</abbr> VirtualBox, or VBox for short.
¶ Prerequisites
- Download and install VirtualBox
- Download and install the VirtualBox Guest Additions (needed for USB connectivity among others)
¶ Select an OpenWrt image
You need a x86 64 bit version of OpenWrt. There is two versions of them:
combined-squashfs.img.gzThis disk image uses the traditional OpenWrt layout, a squashfs read-only root filesystem and a read-write partition where settings and packages you install are stored. Due to how this image is assembled, you will have only 230-ish MB of space to store additional packages and configuration, and Extroot does not work.combined-ext4.img.gzThis disk image uses a single read-write ext4 partition with no read-only squashfs root filesystem, which allows to enlarge the partition. Features like Failsafe Mode or Factory Reset won't be available as they need a read-only squashfs partition to function.
In the guide we'll use openwrt-x86-64-combined-ext4.img.gz because it has fewer limitations.
- Download a stable release of the openwrt-x86-64-combined-ext4.img.gz image from targets/x86/64/ folder e.g. 22.03.5. Or you can try the fresher but unstable snapshot image
- Uncompress the gziped img file. On Linux use the command
gzip -d openwrt-*.img.gz. As a result you should get the rawopenwrt-x86-64-combined-ext4.imgimage file.
¶ Custom Images
You can compile your own image (Target System -> x86-64 and Target Images -> Build VirtualBox image files). ext4 needs to be enabled first.
¶ Convert openwrt.img to VBox drive
- Open a terminal and go in the folder where you have downloaded the file (sorry, the tool has only a command line interface). On Windows, the
VBoxManage.exeis available in the installation pathC:\Program Files\Oracle\VirtualBox. - Convert it to native VBox format by writing this in command line (the same for Windows, macOS and Linux. Sadly this tool does not have graphical user interface):
VBoxManage convertfromraw --format VDI openwrt-*.img openwrt.vdi. This will create theopenwrt.vdifile which a virtual drive for VBox virtual machine.
¶ Error
If you receive an error similar to:
VBoxManage: error: VD: The given disk size 19444018 is not aligned on a sector boundary (512 bytes)
VBoxManage: error: Error code VERR_VD_INVALID_SIZE at /Users/vbox/tinderbox/5.1-mac-rel/src/VBox/Storage/VD.cpp(7002) in function int VDCreateBase(PVBOXHDD, const char *, const char *, uint64_t, unsigned int, const char *, PCVDGEOMETRY, PCVDGEOMETRY, PCRTUUID, unsigned int, PVDINTERFACE, PVDINTERFACE)
VBoxManage: error: Cannot create the disk image "openwrt.vdi": VERR_VD_INVALID_SIZE
or:
VBoxManage.exe: error: VDI: cannot create image 'openwrt.vdi'
VBoxManage.exe: error: Error code VERR_ACCESS_DENIED at D:\tinderboxb\win-6.1\src\VBox\Storage\VDI.cpp(691) in function int __cdecl vdiImageCreateFile(struct VDIIMAGEDESC *,unsigned int,struct VDINTERFACEPROGRESS *,unsigned int,unsigned int)
VBoxManage.exe: error: Cannot create the disk image "openwrt.vdi": VERR_ACCESS_DENIED
you may need to pad the image with dd if=openwrt-x86-64-combined-ext4.img of=openwrt.img bs=128000 conv=sync and use the padded image as input to VBoxManage convertfromraw or try another with this command line: VBoxManage convertdd openwrt-*.img openwrt.vdi.
- Enlarge the image to a useful size (size is in MB)
<!-- -->
$ VBoxManage modifymedium openwrt.vdi --resize 128
0%...10%...20%...30%...40%...50%...60%...70%...80%...90%...100%
- Resize /dev/sda2 partition to new size, or create new partition and copy all files from root partition there and amend /boot/grub/grub.cfg
¶ VM Setup in VirtualBox
¶ VM creation
:!: Tutorial and screenshots from VirtualBox 5.1.8 on Linux host, on Windows or macOS hosts there will be some cosmetic differences (a different top bar) but the VirtualBox panels and buttons will be exactly the same
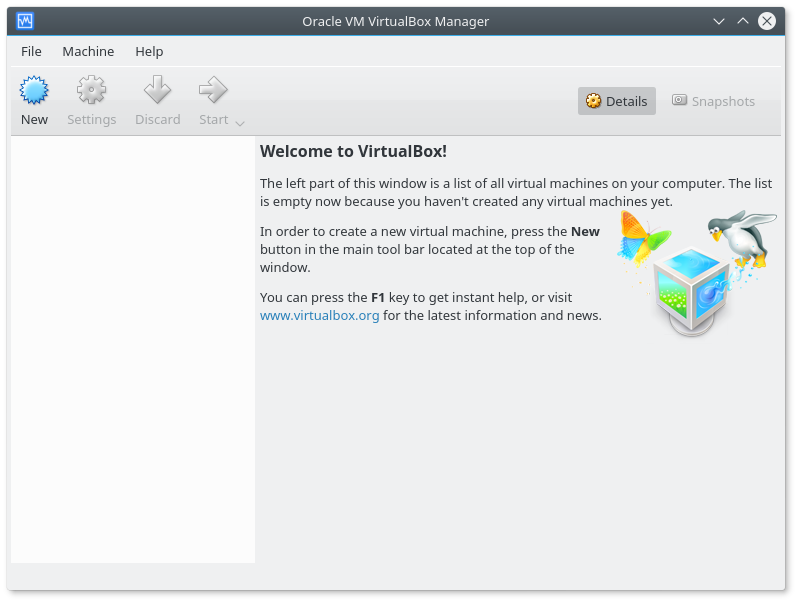 Start VirtualBox and click New to add a virtual machine (VM)
---- 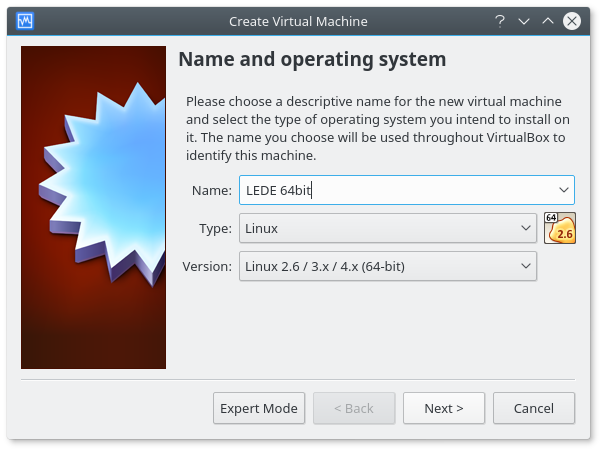 Choose a Name for your virtual machine, choose
 Linux for Type, and Linux 2.6 / 3.x / 4.x (64-bit) for Version, then click Next.
---- 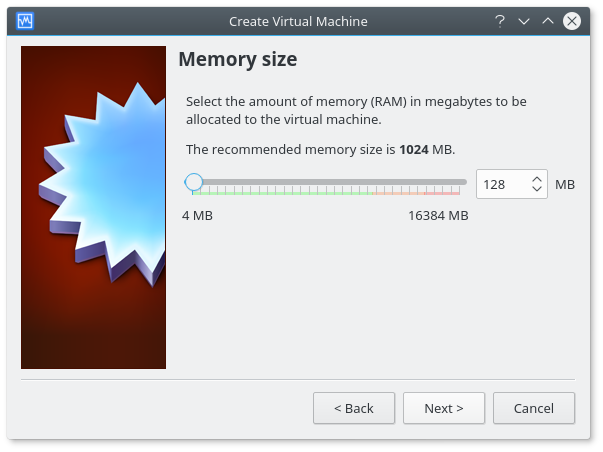 OpenWrt will work fine with much less RAM than the recommended amount, 128 MiB will be enough.
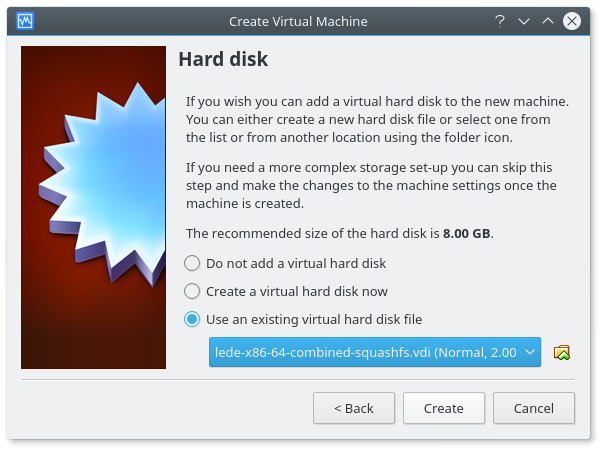 Choose Use an existing hard disk file, click the file icon to open Virtual Media Manager, click Add and choose your
 openwrt.vdi file using the file chooser window. Click Create to end this guided procedure.
---- :!: It's recommended to place the disk image in a permanent place before linking it with VBox. If you move it afterwards, VBox will not find it anymore and will complain about this issue on next start (or when you try to start the VM). It will offer a guided procedure to link the disk image again, so don't worry.
:!: If the Virtual machine keeps restarting with Kernel Panic - not syncing: Attempted to kill the idle task! message, try changing the number of CPUs to 2 and then start the VM. Reference: https://forums.virtualbox.org/viewtopic.php?t=106196.
¶ VM setup
This part of the configuration will deal with setting up networking manually.
The configuration you will set up by following this tutorial is:
- eth0 of the VM on mng (management) interface, fixed address 192.168.56.2, set in VirtualBox as Host-only Adapter on adapter vboxnet0. This interface will be always available to the host even if host or VM are disconnected from any network.
- eth1 of the VM on wan interface, dynamic address, set in VirtualBox as NAT. This interface will be used to access the Internet through whatever setup the host also uses.
- (optional) eth2 of the VM on lan interface, configured depending on your local network, set in VirtualBox as Bridged Adapter. This interface allows other devices (host included) to connect to the VM as if it was a physical device in the local network. Will only work if there is already a local network of some kind.
- //For a setup with 2 bridged physical network cards WAN/LAN Setup see #troubleshooting. The rest of this guide applies to a setup with 2 physical cards as well. //
Note that the order of the "Host-only Adapter" as "Adapter 1" and "NAT" as "Adapter 2" is important for turn-key operation of OpenWrt in the VM. While it can be configured using the console, configuration in this way simplifies getting to a running configuration.
¶ Virtualbox settings
¶ Host-only network adapter
we first need to make sure there is a Host-only network adapter and that it has the right settings
Note: this is found in VBox 6.0 (at least for Windows) under Tools, and is pre-configured.
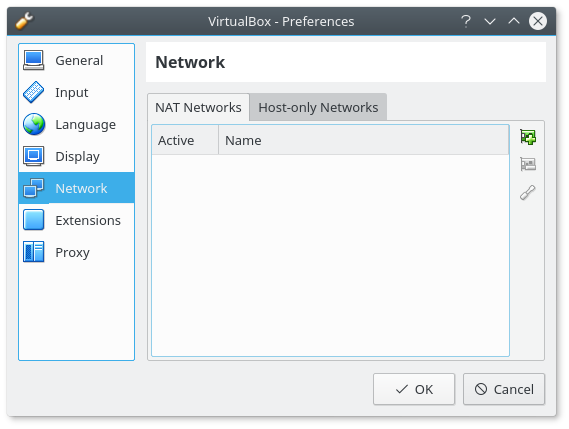 Click on File -> Preferences -> Network
On macOS, this setting may be found through File -> Host Network Manager...
VirtualBox 7.1: File -> Tools -> Network Manager, or press CTRL-H.
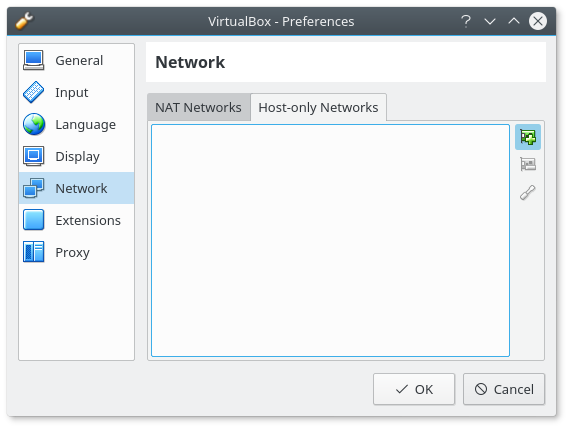 Click on Host-only Networks tab and then if you don't see a vboxnet0 entry click on the + icon on the right of the window to add a new one.
Now select the vboxnet0 entry, and click on the screwdriver icon on the right to open its settings.
---- 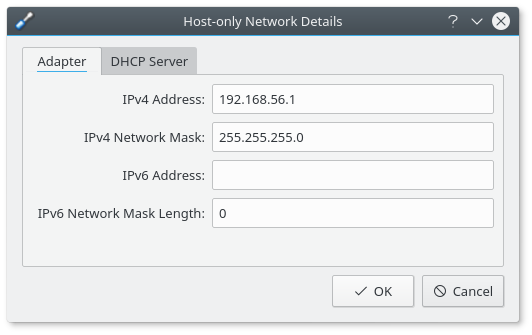 IPv4 Address should be 192.168.56.1, IPv4 Network Mask should be 255.255.255.0, IPv6 Address should be empty and IPv6 Network Mask should be 0
---- 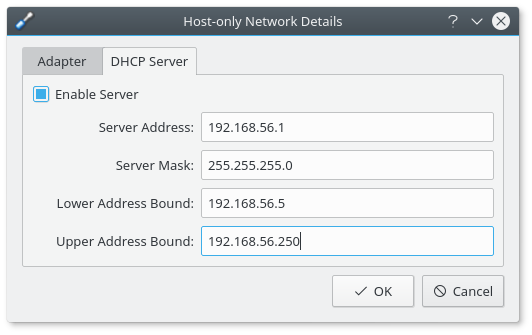 (optional) you can also set the DHCP server as shown in the screenshot if you want to have dynamic addresses to the VM, but for this tutorial it is not required as we set a static address in the VM itself
Press OK to save and close until you are back to VirtualBox Manager interface again.
¶ Network Settings
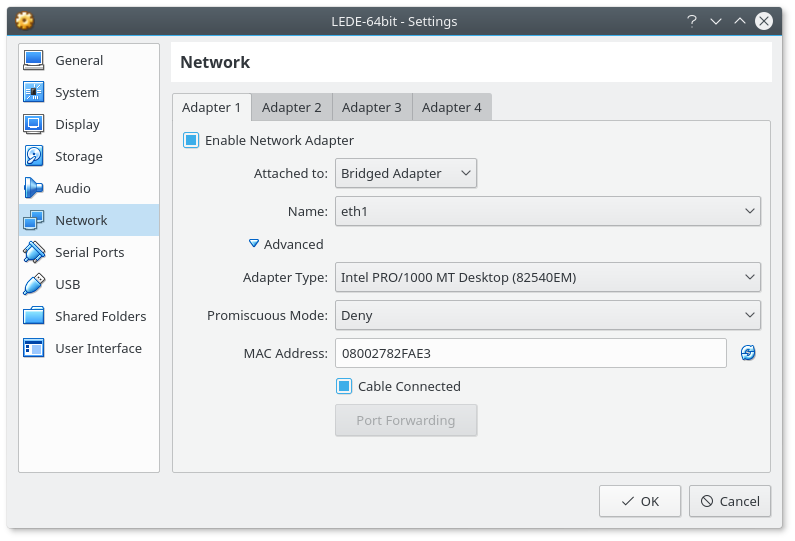 Open the VM's settings
 Go in the Network tab
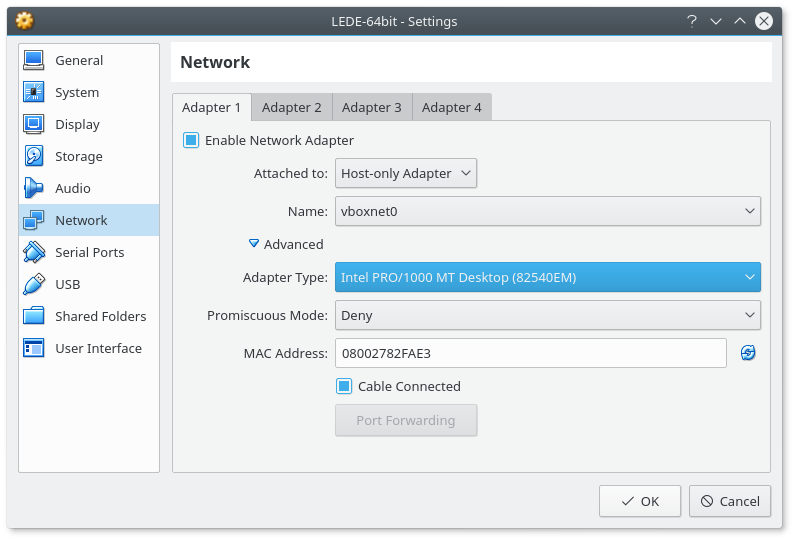 configure Adapter 1:
-
with Host-only Adapter
- select vboxnet0 as (adapter) **Name** - click on **Advanced** and in **Adapter Type** select **Intel PRO/1000 MT Desktop** - **Promiscuous mode** should be set to **Deny** unless you have good reasons to enable it.\\ -
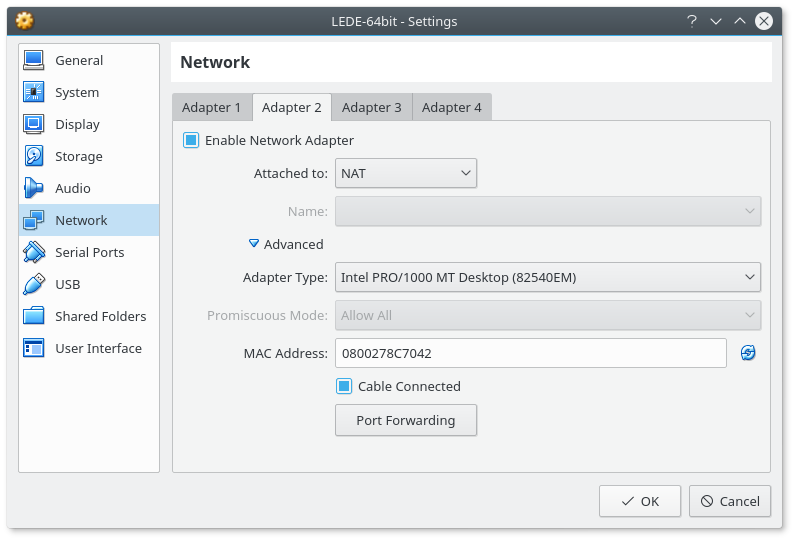
Configure Adapter 2
- with NAT
-
(optional) Configure Adapter 3
- with Bridged Adapter
- in the Name field select the name of the network card (ethernet or wifi) of your PC that connected to a local network. On Windows it has a full device name, on Linux it will have codenames like eth0, eth1 for ethernet or wlp2s0 for wifi.
- Click on Advanced and do the same you did for Adapter 1's advanced options
¶ Virtual Machine Settings
:!: Due to limitations, the keyboard in the virtual machine's terminal is set to US, so some (or most) of your keys may not print the symbols as indicated by the keycaps.
Also, due to the fact that what you see there is a bare machine terminal and not a smart thing like a SSH program (Putty/Kitty/whatever) or a terminal emulator program, you cannot copy-paste text into it.
Don't worry, most of the setup will be done after you are connected with SSH (remote terminal) that does not have any of these issues.
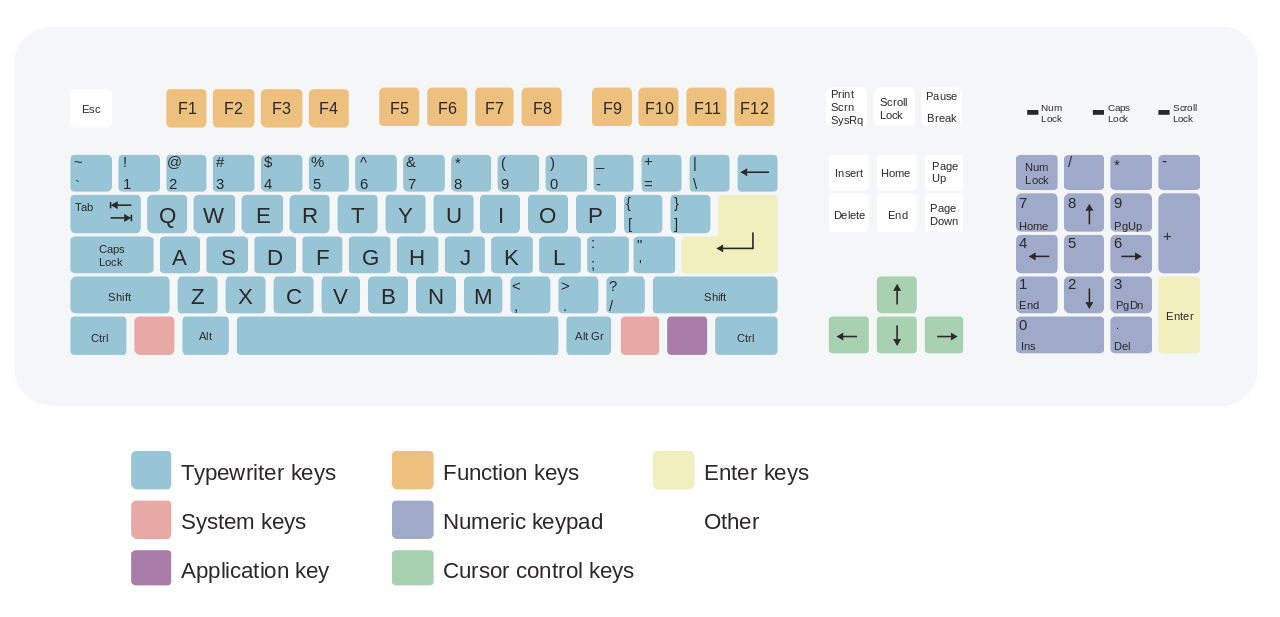 Look at this US keyboard layout to find what button you need to press on your keyboard to generate the right symbol.
- Boot into your Virtual Machine
- Wait 4 seconds for GRUB to boot automatically
- Press Enter to activate the console when the boot messages have finished scrolling by. It may take two or three minutes for "entropy" to be generated (
random: crng init donewith OpenWrt 17.01.4). Until there is sufficient entropy, SSH and other cryptographic functions may fail. - Display the current network configuration
root@openwrt:~# uci show network
network.loopback=interface
network.loopback.ifname='lo'
network.loopback.proto='static'
network.loopback.ipaddr='127.0.0.1'
network.loopback.netmask='255.0.0.0'
network.globals=globals
network.globals.ula_prefix='fd1b:e541:8f1a::/48'
network.lan=interface
network.lan.type='bridge'
network.lan.ifname='eth0'
network.lan.proto='static'
network.lan.netmask='255.255.255.0'
network.lan.ip6assign='60'
network.lan.ipaddr='192.168.1.1'
network.wan=interface
network.wan.ifname='eth1'
network.wan.proto='dhcp'
network.wan6=interface
network.wan6.ifname='eth1'
network.wan6.proto='dhcpv6'
Note that the default LAN address of 192.168.1.1 is present on first boot.
-
Edit the network configuration to allow SSH access by writing these commands and pressing enter:
- uci set network.lan.ipaddr='192.168.56.2'
- uci commit
- reboot
-
Now your VM should be accessible from SSH, user root (no password) address 192.168.56.2.
-
After you have logged in successfully, we can actually do the true configuration. For 22.03 and earlier, copy-paste the following block of code and press enter:
uci batch <<EOF
set network.mng=interface
set network.mng.type='bridge'
set network.mng.proto='static'
set network.mng.netmask='255.255.255.0'
set network.mng.ifname='eth0'
set network.mng.ipaddr='192.168.56.2'
delete network.lan
delete network.wan6
set network.wan=interface
set network.wan.ifname='eth1'
set network.wan.proto='dhcp'
EOFFor 23.05 and later, copy-paste the following:
uci batch <<EOF
set network.mng=interface
set network.mng.device='br-lan'
set network.mng.proto='static'
set network.mng.ipaddr='192.168.56.2'
set network.mng.netmask='255.255.255.0'
set firewall.@zone[0].network='mng'
set firewall.@zone[0].name='mng'
delete network.lan
delete network.wan6
set network.wan=interface
set network.wan.device='eth1'
set network.wan.proto='dhcp'
EOF -
now write uci changes to check if the setting configuration was loaded correctly. If you see the following on 22.03 and earlier (the network.mng entries MUST be the same as the ones shown here, the network.wan might be slightly different), everything went well
root@openwrt:~# uci changes
network.mng='interface'
network.mng.type='bridge'
network.mng.proto='static'
network.mng.netmask='255.255.255.0'
network.mng.ifname='eth0'
network.mng.ipaddr='192.168.56.2'
-network.lan
-network.wan6
network.wan='interface'For 23.03 and later, you should see
root@OpenWrt:~# uci changes
firewall.cfg02dc81.network='mng'
firewall.cfg02dc81.name='mng'
network.mng='interface'
network.mng.device='br-lan'
network.mng.proto='static'
network.mng.ipaddr='192.168.56.2'
network.mng.netmask='255.255.255.0'
-network.lan
-network.wan6 -
if all is well, save config with uci commit && reboot, if all is NOT well, write reboot to erase the temporary changes and find a way to set the above configuration manually.
-
close and open again the SSH terminal when the VM has restarted, with same connection parameters (user root and 192.168.56.2)
-
now you should have both internet access (try a opkg update) AND a management interface with a static address you can connect your SSH client program to even if your PC is disconnected from a local network.
-
the optional Bridged Adapter on Adapter 3 isn't crucial for basic functionality and is also specific for your own local network parameters. In my own network (and in most home networks) it will work fine for 22.03 and earlier if you write
uci batch <<EOF
set network.lan=interface
set network.lan.ifname='eth2'
set network.lan.proto='dhcp'
EOF
uci commitand for 23.05 and later
uci batch <<EOF
set network.lan=interface
set network.lan.device='eth2'
set network.lan.proto='dhcp'
EOF
uci commit
service network restartIf you have more complex requirements you will have to set that up on your own by reading the documentation, or through luci.
-
you can now install packages to this images as normal, you will probably want to install luci, write opkg update && opkg install luci, then you can connect to the VM's luci by typing 192.168.56.2 in your browser address bar or click on this link to get there.
¶ Troubleshooting
- If you rebuild the disk image, and VirtualBox complains about invalid UUIDs for the disk
- You need to remove the disk from both the VM and from the Virtual Media Manager
- Then add the disk image to the VM again
<!-- -->
- If you want to use a bridged VPN on your device to bridge it to your local network you need to set the
- Promiscuous Mode of the corresponding Bridged Network Adapter to "Allow All" or else your local network won't be bridged properly to your vpn bridged network
<!-- -->
- You can also have 2 physical network interfaces on your main operating system that is hosting the virtual machine. In this case
- Use one Network Adapter as WAN and in VirtualBox you select Bridged Adapter with Promiscuous Mode to Deny
- Use the other Network Adapter as LAN and in VirtualBox you select Bridged Adapter with Promiscuous Mode to
- Deny if you don't want to expose bridged virtual networks to your physical network
- Allow All if you want to connect your bridged virtual network to your physical network
- If you use KDE, and click on the 'Networks' icon in the KDE System Tray, you see for example 'Wired Connection 1 (vboxnet0)' and 'Wired Connection 1 (enp*s*)' (for a physical Ethernet port). The problem is: you can only connect to one at a time, or one of both no longer works. If you click 'Configure' on either, you end up on the same entry 'Wired Connection 1'.
- To fix this, click 'Configure' on either, and for the shared 'Wired Connection 1', go to tab 'Wired', and at 'Restrict to device:' choose the device for the physical Ethernet port.
- If desired, also click on the '+', double-click 'Wired Ethernet', and at 'Restrict to device:' choose 'vboxnet0'.
¶ Run with VirtualBox automatically on Start of Windows OS
- Ordered List ItemImport the following entry to your registry or add it manually:
- [HKEY_LOCAL_MACHINE\SOFTWARE\Microsoft\Windows\CurrentVersion\Run]
- "VB-MYDEVICE"="\C:\Program Files\Oracle\VirtualBox\VBoxManage.exe\ startvm \NAMEOFVBINSTANCE\ --type headless"
<!-- -->
- Alternatively create 2 shortcuts and use the Windows Task scheduler
- "C:\Program Files\Oracle\VirtualBox\VBoxManage.exe" startvm MYDEVICE --type headless
- Create a task in the Scheduler triggered by logon of any user as action the shortcut
- "C:\Program Files\Oracle\VirtualBox\VBoxManage.exe" controlvm MYDEVICE acpipowerbutton
- Create a task in the Scheduler triggered by an event and as action the shortcut
- Begin the task: On an event
- Basic Log: System
- Source: User32
- Event ID: 1074
- Create a task in the Scheduler triggered by an event and as action the shortcut
- "C:\Program Files\Oracle\VirtualBox\VBoxManage.exe" startvm MYDEVICE --type headless
<!-- -->
- Or use following:
<!-- -->
- [[https://github.com/onlyfang/VBoxVmService|VBoxVmService]] Windows Service to run VirtualBox VMs automatically
¶ See also
- VirtualBox Advanced
- Other virtualization options: Docker, VMware etc.