¶ VirtualBox Advanced
¶ Overview
This guide extends the basic VirtualBox HowTo with broader setup recommendations, samples and common "gotcha-s".
NOTE: Use a wired virtualbox host (unless you are really confident with virtualbox i.e. 80211 bridging issues ).
¶ Prerequisite Concepts
¶ x86_64 Basics
As the operating system within VirtualBox is basically an x86_64 host, having a general grasp of the hard drive partition setup, bootloader operation et. al. is beneficial. Particularly, when you need to undertake more advanced network interface setup within the VM and then translate that to VBox nics. In other words, lack of confidence performing bare metal config will compound troubleshooting if you are unable to clearly differentiate what is physical and what is virtual. In this case perhaps using an old pc or spare usb disk to test on real hardware first is a good first step.
¶ squashfs vs ext4
You'll likely need to select between a combined squashfs vs ext4 OpenWrt image to use[1]. For most hardware supported by OpenWrt, combined-squashfs is recommended (and in many cases the only type of image offered). For x86 hardware where space is not an issue, OpenWrt is offered also in combined-ext4 images. Let's look at what are the differences.
¶ Where is my router?
¶ Using squashfs:
- sysupgrade at any time to update the kernel, which is useful if you are tracking snapshot to have the latest and greatest
- factory reset
- the default read-write partition in a squashfs image is 128MB, it's uncommon to actually fill it up with common package additions
- If you need more space for data you can always increase the virtual disk size and add a data partition (which will be preserved on sysupgrade), or even better add more virtual drives you would use just for storage.
Squashfs images are neat when you are using the Imagebuilder to integrate all packages you want in a single re-settable image. You can install with sysupgrade, and not lose any of your "installed packages" as you have integrated them in the base firmware image.
Since you have Virtualbox anyway, why not have a Debian or Ubuntu VM and use the Imagebuilder too. It's a very convenient way of tracking snapshot(master) to have the latest and greatest, and the only practical way to do so for most other devices supported by OpenWrt, so this is more or less the best "choice" for OpenWrt veterans that have deployed many devices and are using the imagebuilder already.
NB: With Imagebuilder, the size of the read-write partition is irrelevant as all packages are embedded in the squashfs read-only partition that is enlarged as needed, so 128MB is available for config only.
¶ Using ext4:
- With ext4 you lose the ability to sysupgrade but you can keep updating packages over and over. ( todo: clarify see final sentence )
- Depending on your hdd durability, there is more wear but most users have zero issues. Kindof mute for vm's.
- Updating the kernel must be done manually by mounting the first partition (/dev/sda1 if you have only one disk) and replacing the "vmlinuz" file you find in the /boot folder with the file with the same name you find in the download folder https://downloads.openwrt.org/releases/18.06.4/targets/x86/64/ , then installing the "kernel_xxxx.ipk" package you find here https://downloads.openwrt.org/releases/18.06.4/targets/x86/64/packages/ for example if you just updated to 18.06.04 stable release, and then reboot. \That's a virtual package, it exists only to tell the system what kernel version is installed but does not actually install anything. The reason this is not done is that the kernel installation in 99% of OpenWrt targets happens through Sysupgrade process, not through packages, so none took the time and effort to actually have kernel upgrades done properly in this fashion. But anyway, it's easy enough to script around this issue I guess.
- With ext4 you can increase the partition size to your heart's content, but you will need to do it "offline", i.e. by booting a Gparted liveCD in your Virtualbox VM, as the default ext4 image is too small (technical reason: the filesystem does not contain enough inodes at this size) to allow online resizing (ext4 can be enlarged without using a liveCD if it is big enough at the start)
This type of image mimics a more conventional Linux distro like Debian or Ubuntu, where you have packages and you keep updating or installing them as needed. But afaik this is a bit of a pain to do if you try to follow snapshot, as OpenWrt does not implement the ability to have multiple ( non-identical ) kernels with kernel modules (the Linux "device drivers") installed at the same time, and select what kernel to boot when you reboot. Although it is possible to manually edit grub.cfg to support this manually using differing rootfs partitions for each kernel ( without sysupgrade support )
So when you go and update the kernel or the kernel modules (packages that start with kmod-xxxx.ipk) you will probably experience breakage or will have to fight against opkg that refuses to install them as they are not compatible with the kernel in use. I think that you could actually do this if you install the kernel first, which is a virtual package, and then install the kmod packages and then reboot immediately, but I never tried so YMMV.
Therefore, using sysupgrade to flash a new combined-ext.bin will typically zap the "boot" and "rootfs" partitions, config is migratable, packages are not.
¶ VirtualBox Networking Basics
Knowledge of the basic network types offered by VirtualBox will help you immensely...
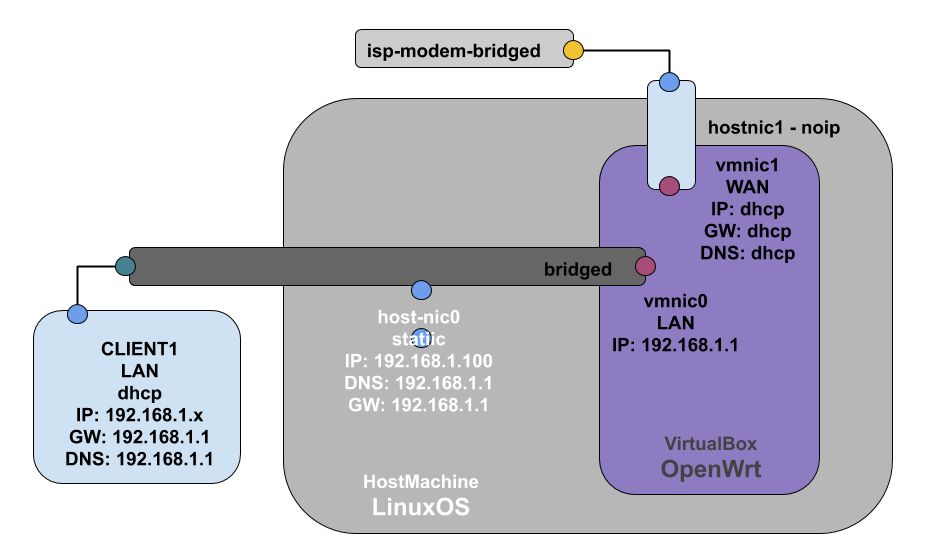
- Take a few minutes to draw a simple diagram of how a HOST network maps to a GUEST machines networks/interfaces will save you much drama and need to reconfigure down the track. [2]
¶ Networking Ideas
¶ Example 1
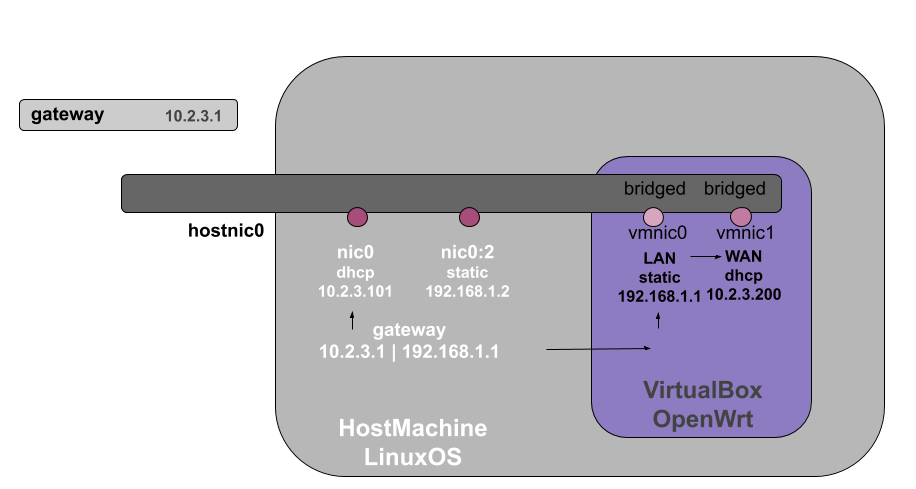
Example 1 is useful for testing both LAN and WAN sides of OpenWrt.
- All connections use the same physical network and separation is logical only.
- Both sides of the router are accessible.
- Changing the gateway and dns on your HOST will send your traffic via OpenWrt ( dual-nat ).
OpenWrt VM
vmnic0     bridged     LAN     192.168.1.1                   (disable dhcp server)
vmnic1     bridged     WAN     (dhcp from normal network)

HostOS
hostnic0   dhcp                (or normal setting)
hostnic0:2 192.168.1.2
This configuration is highly adaptable... with the caveats of not using the OpenWrt dhcp server, and the shared physical medium ( lesser isolation ). You could easily run an openvpn client and assign LAN hosts the 192.168.1.x range etc. so send them via the OpenWrt VM.
¶ Linux VirtualBox Auto Create
NOTE: Requires: wget, gunzip and VBoxManage ( VirtualBox )
#!/bin/bash

sNAME="openwrtx64-`date +%Y%m%d-%H%M`"
dirCACHE="${HOME}/cache"; mkdir -p $dirCACHE
VMFOLD="`cat ~/.config/VirtualBox/VirtualBox.xml | grep -i SystemProperties | cut -d'"' -f2`"
VDI="${sNAME}.vdi"
DISKSIZE='512000000'
VMNAME="${sNAME}"
IMGC="${dirCACHE}/openwrt-18.06.4-x86-64-combined-ext4.img.gz"
URL="https://downloads.openwrt.org/releases/18.06.4/targets/x86/64/openwrt-18.06.4-x86-64-combined-ext4.img.gz"
WGET="wget"; GUNZIP="gunzip"; VBOXMANAGE="VBoxManage"

echo "    Creating VM: $VMNAME"
echo "          Cache: ${HOME}/cache"
echo "       Disksize: $DISKSIZE"
sleep 2

if [ ! -f "${IMGC}" ]; then
    echo "Downloading Image: $URL"
    $WGET "${URL}" -O "${IMGC}" || echo "Failed to download: ${URL}" && exit 1
else
    echo "Using cached Image: $IMGC"
fi
sleep 2

$VBOXMANAGE createvm --name $VMNAME --register

$VBOXMANAGE modifyvm $VMNAME \
    --description "openwrt vbox" \
    --ostype "Linux26" \
    --memory "512" \
    --cpus "1" \
    --nic1 "bridged" \
    --nictype1 82540EM \
    --nic2 "bridged" \
    --nictype2 82540EM

$VBOXMANAGE storagectl $VMNAME \
    --name "SATA Controller" \
    --add "sata" \
    --portcount "4" \
    --hostiocache "on" \
    --bootable "on" && \

$GUNZIP --stdout "${IMGC}" | $VBOXMANAGE convertfromraw --format VDI stdin ${VMFOLD}/${VMNAME}/${VDI} $DISKSIZE

$VBOXMANAGE storageattach $VMNAME \
    --storagectl "SATA Controller" \
    --port "1" \
    --type "hdd" \
    --nonrotational "on" \
    --medium $VMFOLD/${VMNAME}/$VDI


echo "Open the VNIC in VirtualBox to populate bridged adapter name"
echo "############################################################"
echo "       DISABLE DHCP on router!                              "
echo "############################################################"
echo ""

exit 0
¶ Add some shaping
As virtualbox built in shaping only works in one direction... example 1 is the perfect network architecture to perform shaping using the built in virtualbox bandwidth limits. It is possible to change the speed on the fly while the vm is running.
( NOTE: "wan" in the script below refers to the vm-nic1(second) )
#!/bin/bash

VMNAME="openwrtx64-20191002-2352"
lannicspeed="350k" # .35mb/s use m for mbps
wannicspeed="360k" #

VBoxManage bandwidthctl "$VMNAME" add Limitlan --type network --limit $lannicspeed
VBoxManage bandwidthctl "$VMNAME" add Limitwan --type network --limit $wannicspeed
VBoxManage modifyvm "$VMNAME" --nicbandwidthgroup1 Limitlan #assign to nic1
VBoxManage modifyvm "$VMNAME" --nicbandwidthgroup2 Limitwan #assign to nic2
¶ Tagging for VM's
Note: example ip link is non-permanent... see your distro for appropriate place to configure your host nic for a vlan.
You can use a single cable as a "trunk". This essentially turns your wired link into a managed switch as you will tag VLAN per vm upstream on the wired link.
This can be used for clients... with openwrt on a "real router" running several vlans over a single LAN port. Or you could use this method for an OpenWrtVM... tag several of it's interfaces outside of the guest software... "mimicking" a managed switch.
This example shows clientVM's to an upstream OpenWrt router.
######################################################### Step1 ONHOST
NIC="enp0s25"
ip link add link $NIC name $NIC.50 type vlan id 50
ip link set dev $NIC.50 up

######################################################### Step2
In VirtualBox change bridge for a VM to interface NIC.50

######################################################### Step3 In Openwrt
#-Go to switch... add vlan 50 tagged on same port as pc/server + cpu1
#-Go to interfaces... add interface... NAME + INTERFACE:ethNcpu.50 + IP:192.168.50.1 etc. etc.


################################## debugging on host
#ip -d link show $NIC.50
#ip link delete $NIC.50
#tcpdump -nnei $NIC -vvv
¶ Example:1b SameSegment-same-Subnet PreRouter
¶ Advantages
- no dual nat
- seamless client redirection via dhcp gateway re-assignment
- reduces management / configuration overhead due to single subnet/range
- cpu and memory intensive services can be run on your best hardware
¶ Disadvantages
- firewall is dependent on edge router
- introduces second point of failure for clients using the "middle" router
- vm host / guest power consumption
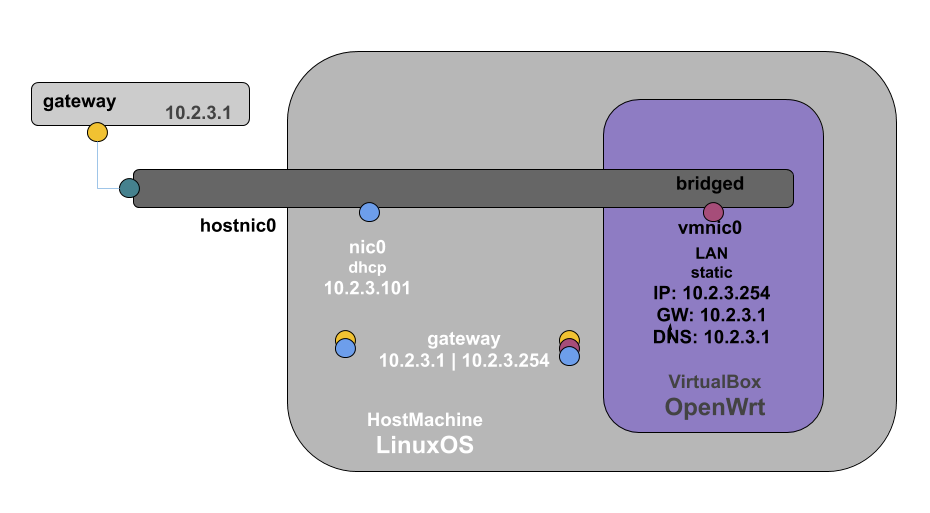
As show in the diagram;
- Only the LAN interface is bridged, with a static ip on your LAN subnet
- The LAN interface has both gateway and dns servers set to the edge router
- Clients gateway and/or dns pointed to the VM should you wish to use say VPN etc. there...
You now have a powerful internal router for VPN and any other service you wish. Leaving the edge router to do simple routing, nat and firewalling tasks. Give some clients your normal LAN gateway and some clients the OpenWrt VM, and presto! poor mans PBR  .
.
¶ CLI Basic Network Access Setup (vi dhcp)
* use gateway and dns options for static ip
¶ CLI Install LUCI on snapshot
¶ Buildroot Export
When testing anything not hardware specific. Using the buildroot and firing it up straight away can be a big time saver. The sample script shows basic buildroot to vbox quick setup.
#!/bin/bash

sNAME="openwrtx64-`date +%Y%m%d-%H%M`"
VMFOLD="`cat ~/.config/VirtualBox/VirtualBox.xml | grep -i SystemProperties | cut -d'"' -f2`"
VDI="${sNAME}.vdi"; DISKSIZE='512000000'; VDIOSZ='1920'; VIDMEM="16"
VMNAME="${sNAME}"
VBOXMANAGE="VBoxManage"
brvdi="bin/targets/x86/64/openwrt-x86-64-combined-ext4.vdi"

cat .config | grep -q '^CONFIG_VMDK_IMAGES=y' || echo "Enable vm-image creation and run make" && exit 1
if [ ! -f "${brvdi}" ]; then echo "You no built vdi at: $brvdi ... ran make?" && exit 2

echo "Creating VM: $VMNAME" && sleep 2
$VBOXMANAGE createvm --name $VMNAME --register 2>/dev/null >/dev/null

echo "Copying buildroot vdi to ${VMFOLD}/${VMNAME}/${VDI}"
cp $brvdi ${VMFOLD}/${VMNAME}/${VDI}

$VBOXMANAGE modifyvm $VMNAME --description "openwrt vbox" --ostype "Linux26" \
    --memory "512" --vram "$VIDMEM" --cpus "1" \
    --nic1 "nat" --nictype1 82540EM \
    --nic2 "nat" --nictype2 82540EM 2>/dev/null >/dev/null

$VBOXMANAGE storagectl $VMNAME --name "SATA Controller" --add "sata" \
    --portcount "4" --hostiocache "on" \
    --bootable "on" 2>/dev/null >/dev/null
$VBOXMANAGE storageattach $VMNAME --storagectl "SATA Controller" \
    --port "1" --type "hdd" --nonrotational "on" \
    --medium $VMFOLD/${VMNAME}/$VDI 2>/dev/null >/dev/null

exit 0
¶ Openvswitch
Openvswitch can be useful when you wish to go beyond basic virtualbox networking options. For a basic test. Try running your VM LAN interface bridged to a vswitch bridge.
sudo apt-get install -y openvswitch-switch bridge-utils
sudo ovs-vsctl add-br br201
sudo ifconfig br201 192.168.1.2 netmask 255.255.255.0 up
Then change the correct VM>bridged-to interface to br201 in VirtualBox.
NOTE: You may need to set the vbox-nic promiscous mode to Allow if bridging to a host bridge https://forum.openwrt.org/t/only-the-first-interface-in-br-lan-is-working-properly-with-a-virtualbox-x86-64-openwrt/62539/5
¶ ToDo Serial and SSH console examples
¶ Video of Boot
For boot-time debugging purposes... you would generally want to attach a vbox-console. One nice and easy trick is to use the capture facility of VirtualBox. Not so handy for copy paste but this method has it's own advantages.
Settings => Display => Recording [x] Enable Recording
( NB: you must repeat this every boot, you can find the default .webm file in the VirtualBox machines directory )
¶ Tips beyond the Basic
- vnic0 ( LAN ) is key. Get access to it... Know how it works at each level of abstraction.
- Don't test 500 things at once... check each connection piece by piece. No WAN access in a VM is the same as no WAN access on any network, etc. etc. etc. Simplify and conquer.
- If the VM is to be used for mission critical traffic... test thoroughly, and configure all HOST settings in a persistent manner.
- If you really need to isolate clients. Seriously consider using 2 HOST NICs.
¶ Gotcha-s
¶ Initial vmnicX>LAN access
If your having a hard time accessing the OpenWrtVBox-LAN ( LUCI )
- Check the network layers
- Your HOST or CLIENT ip in 192.168.1.x
- No other network 192.168.1.x in use!
- Use the VirtualBox GUI to access the OpenWrtVbox commandline ( ifconfig OR ping OR edit /etc/config/network and /etc/init.d/network restart
- Check the VirtualBox GUI and selectively bridge each vnic and check that "Connected" is ticked. If the CLIENT is another VM... Change the network type to bridged also.
NOTE:
- You may need to clone eth0 for eth2, eth3 etc, if you have more than two virtual nics.
¶ I ran out of space
Easy! Power Down the VM, add a new disk ( VirtualBox -> Machine-Settings -> Storage -> Add Storage Attachment -> Add New Disk -> Create New Disk) then follow [3] from step 3-ish... to setup /overlay storage.
¶ Can I make it simpler?
Sure! Use hostonly ( no dhcp <- VirtualBox Network Settings ) for OpenWrtVBoxLAN and a SECOND VM with it's single VNIC also set to hostonly as the client. Set OpenWrtVBox VNIC2-WAN to bridged.
¶ Questions you should have answers to
- What are your disk requirements? ( many packages will need an additional disk as overlay, resizing the default partition within an official img or using the buildroot to specify disk parameters from the get-go )
- How many Network Interfaces will the GUEST require? ( i.e.; LAN, WAN and SPARE )
- Which physical or HOST interfaces/networks will these GUEST interfaces be mapped to?
- On what network will your GUEST client/s reside? Are you comfortable troubleshooting basic connectivity?
- Disk space available on the host? Its lovely to generate a router with 30GB space in the buildroot... but do you want to be cloning/using/backing up that much?
- Do you need to start the VM with networking disconnected to disable dhcp or change the LAN ipaddress?
¶ Resources
VirtualBox Networking Overview https://www.youtube.com/watch?v=cDF4X7RmV4Q
OpenWrt x86 Basics OpenWrt on x86 hardware aka PC or Servers
[3] OpenWrt on VirtualBox HowTo
[5] Image filesystems and alteration in detail https://quantumwarp.com/kb/articles/25-dsl-broadband/899-run-lede-as-a-virtualbox-virtual-machine
[7] forum re: macos 80211 bridging issues https://forum.openwrt.org/t/virtualbox-openwrt-works-fine-but-clients-connecting-to-vm-router-have-no-internet/71398